
- Make sure you have already logged in through your Google account.
- Enter https://tagmanager.google.com/ into your browser.
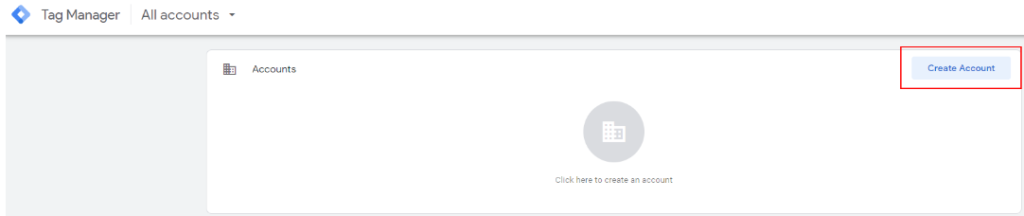
- Click “Create Account” in the upper right-hand corner.
4. Fill in the details with your own information (choose website name as “Account Name” & “Container Name”, India as “Country” and Web as “Target Platform”) and then click “Create.”

5. Accept the Terms of Service Agreement by checking the box and then clicking on “Yes”.

6. Congratulations!! Your GTM account has now been created.
- Login to your GTM account.
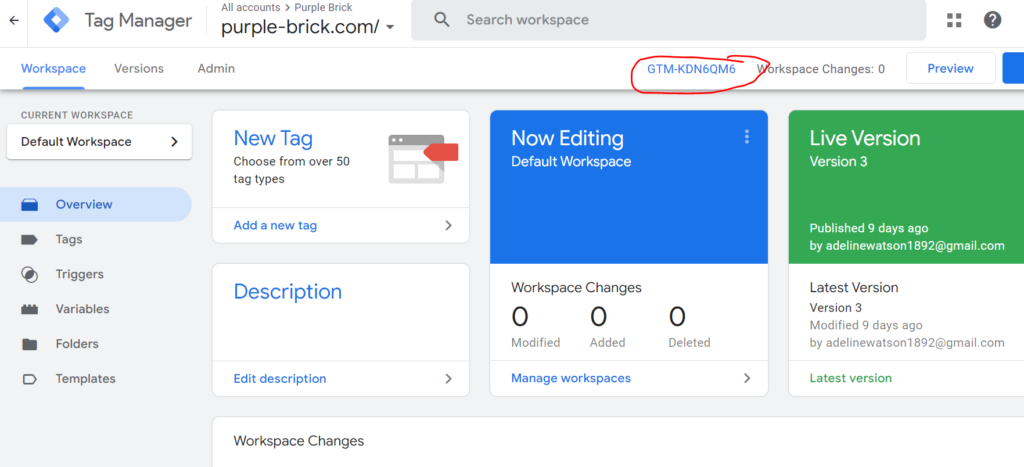
- Go to overview and get the codes by clicking on GTM ID highlighted in the screenshot.
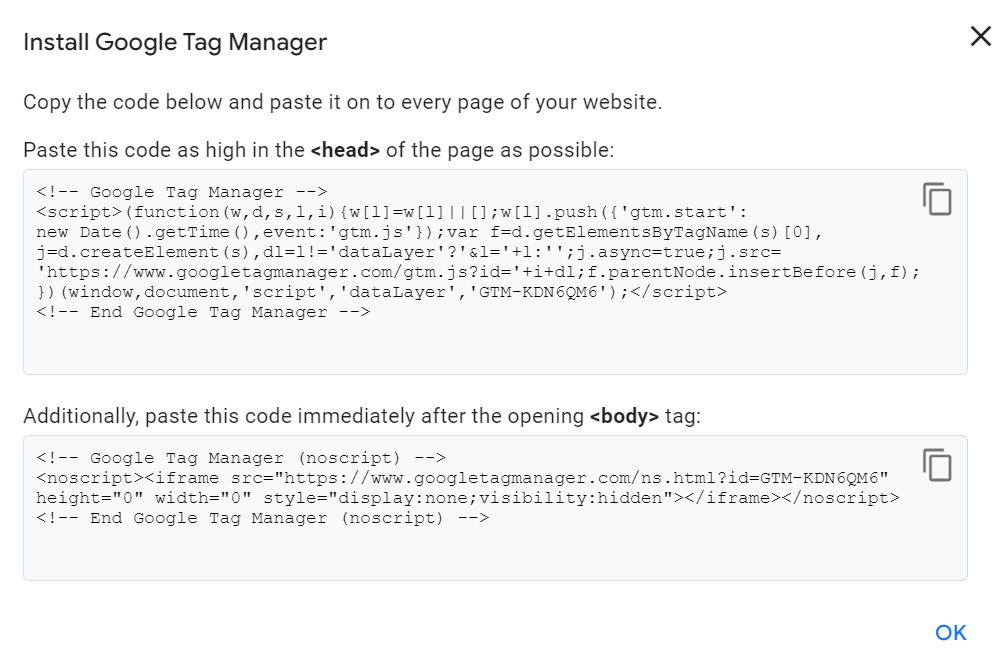
- A new window will appear. These two code snippets need to be added to the header (inside tag) and in the section on all of your web pages.
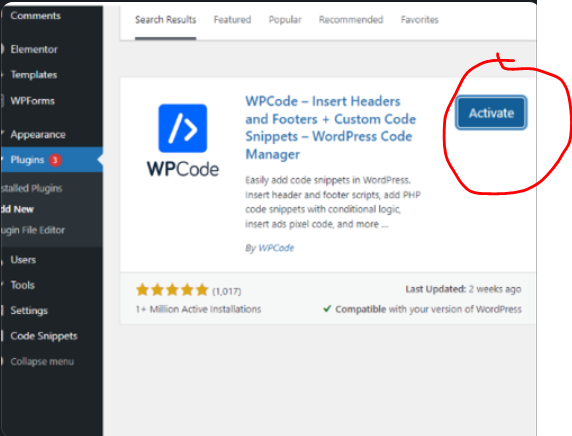
3. Now log in to your WordPress dashboard and then install the “WPCode” plugin.
- Login to WordPress Dashboard.
- Go to “Plugins” and then select “Add New”.

- Search for the “WPCode” plugin in the search bar and then install it.


4. Activate the plugin once it’s installed.
5. Upon activation, go to the Code Snippets » Header & Footer page.
6. Now you will see Header & Body Sections.
7. Go back to your Google Tag Manager account and copy the codes into the Header & Body box respectively.
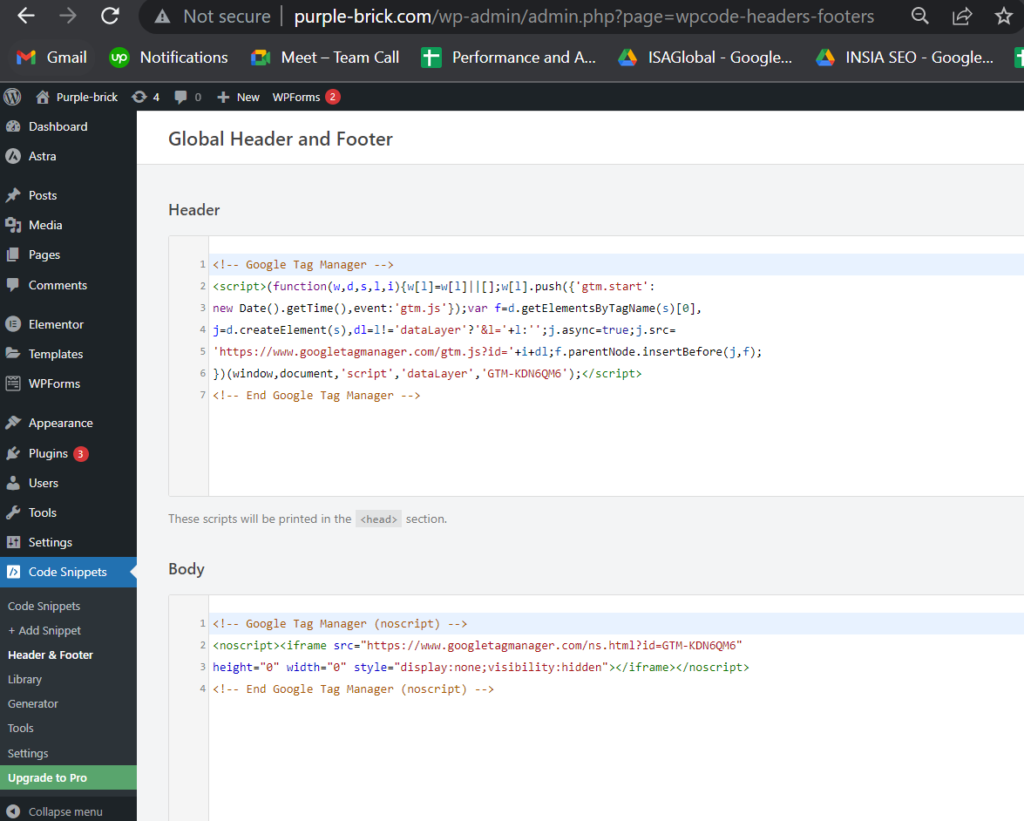
8. Do not forget to Save it.
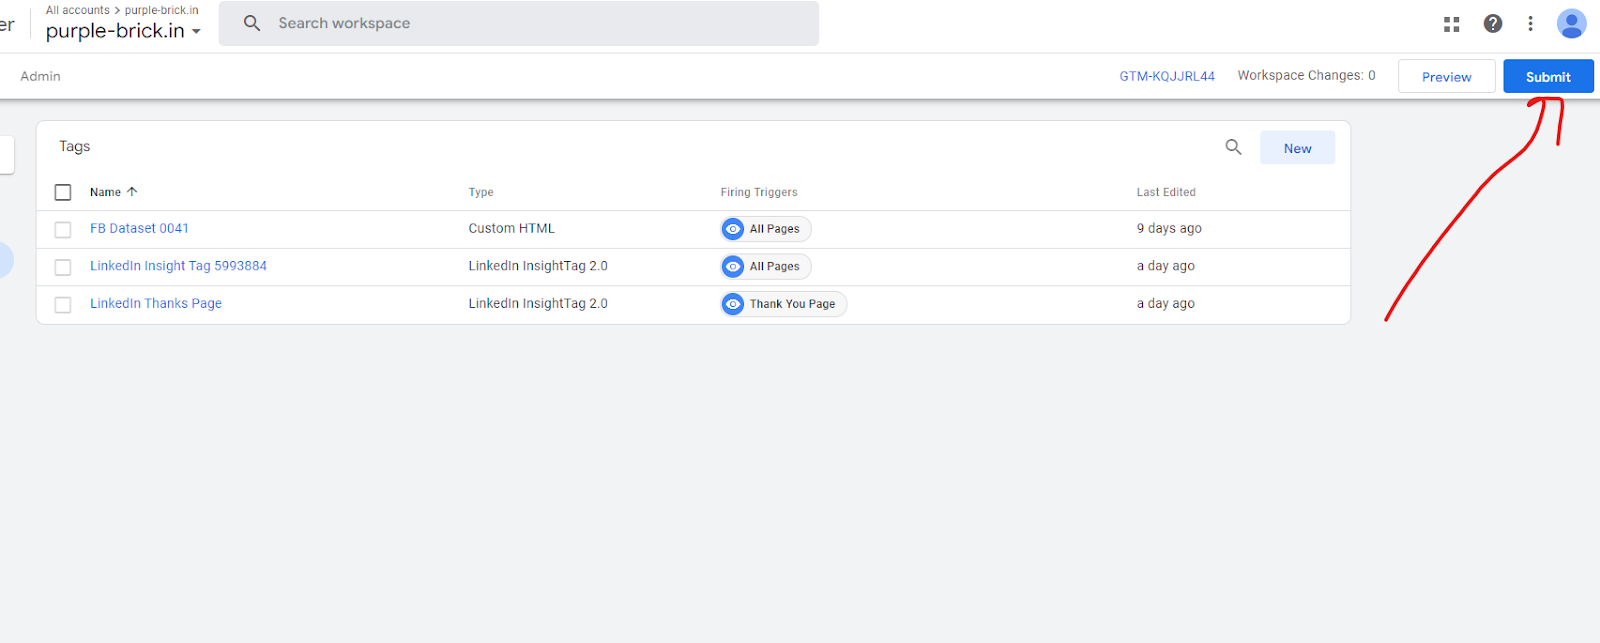
9. Go back to the GTM account and click on Submit.

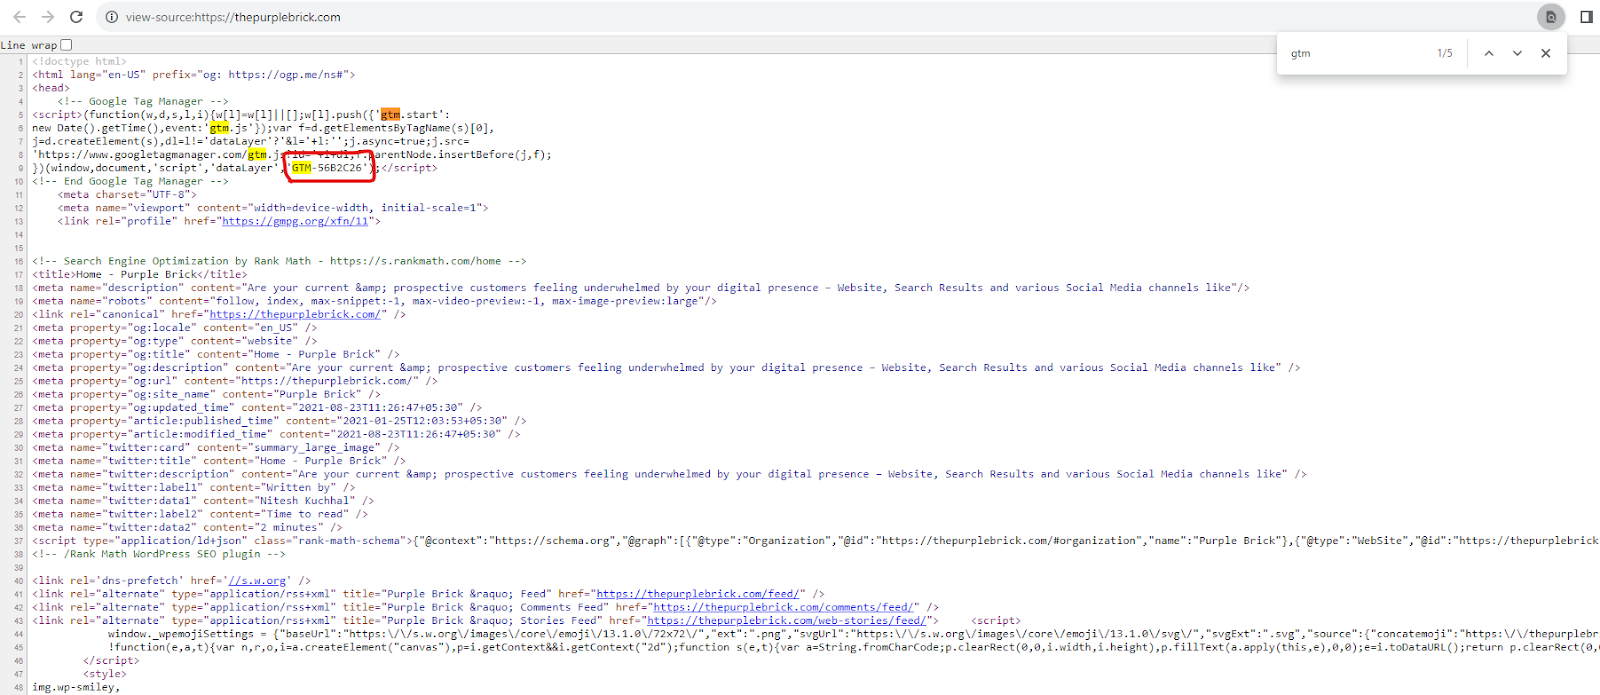
2. Check view source by Ctrl+U
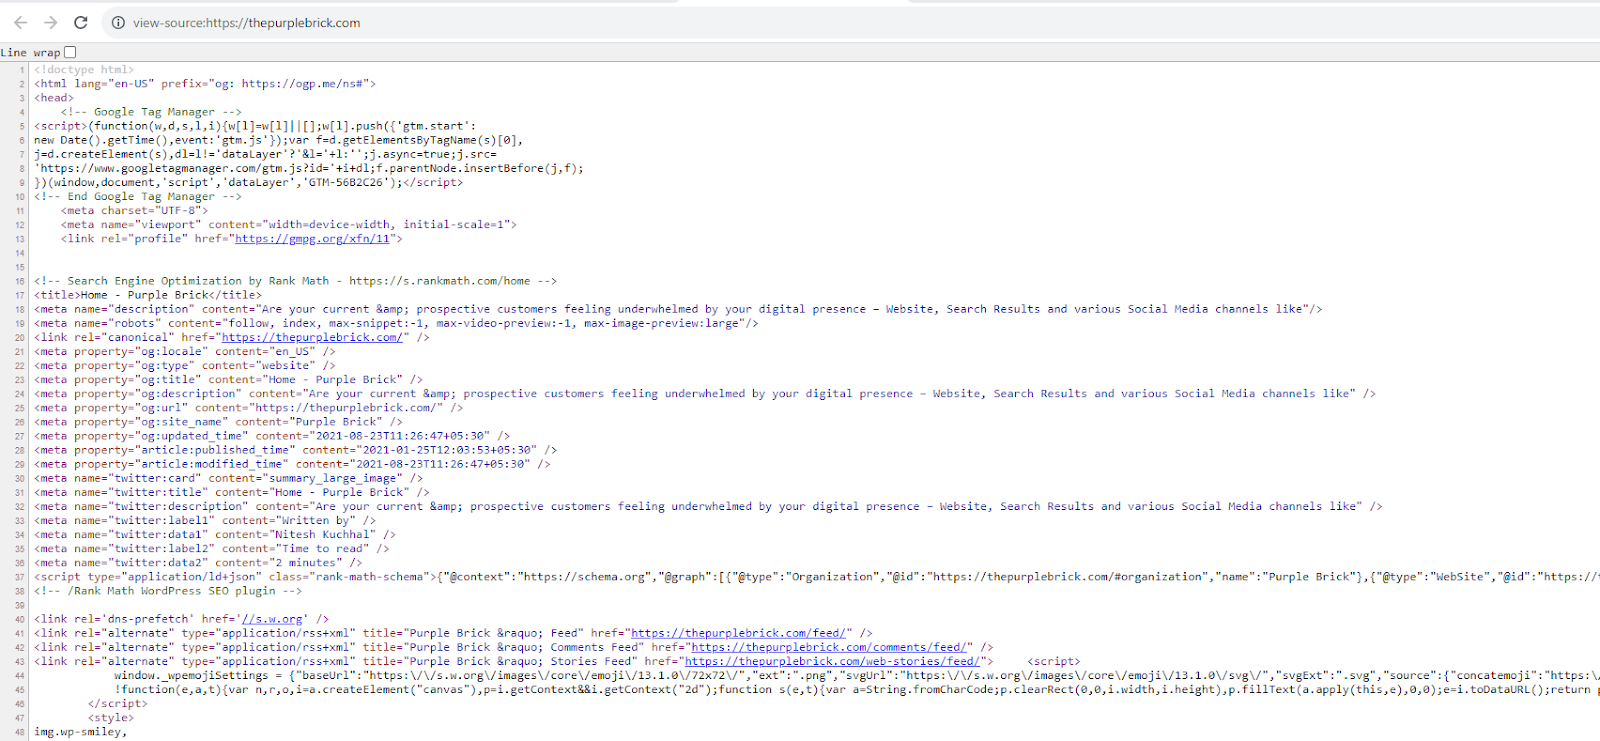
3. Then search by GTM ID
Note: Only 2 Business Manager accounts can be created from Single Profile.
A) You may already have a Business Manager. Check it!
- Log in to your personal Facebook account.
- Find the existing Business Manager by going to https://business.facebook.com/select
- If you have a business manager, you will see something like this:
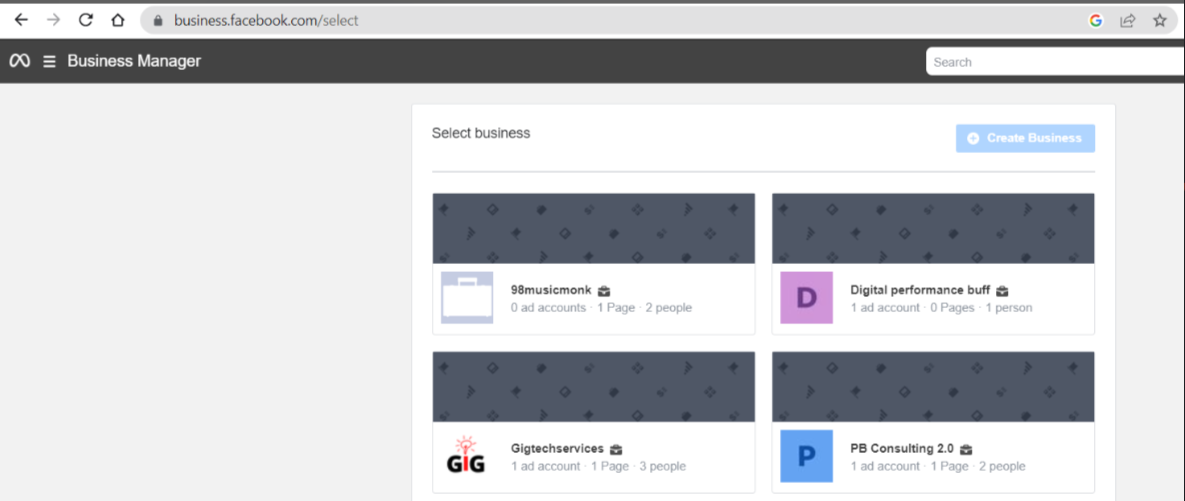
- Then select the relevant one and go to “Next section” (and skip “point B”).
B) To create new BM, follow the steps given below
If you already have a business manager, then skip this step
- Log in to your personal Facebook account.
- Go to business.facebook.com/overview

- Click Create an account.
- Enter a name for your business, your name, and your email address, and Submit.
- The pop-up screen will direct you to check your email for confirmation of your account.
- Click the link in your email to confirm your account.
How to open Business Setting of Business Manager-
- Log in to your personal Facebook account and Go to https://business.facebook.com/select.
- Then select your BM (Business Manager) and you will be redirected to the Business Setting.
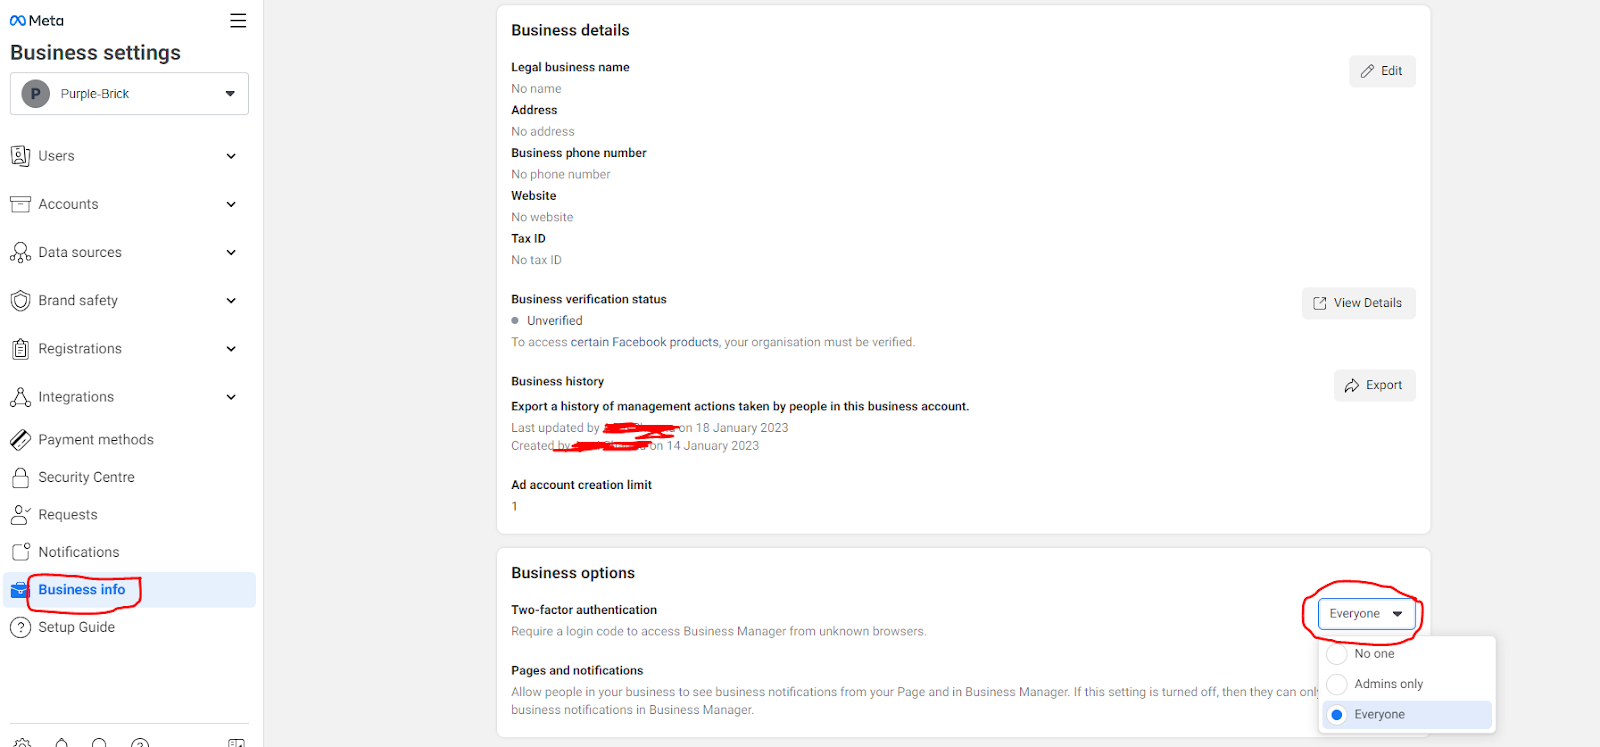
Most Important things of “Business Info” section to remember after creating BM
1. Enable “Two-Factor Authentication”
- Open Business Manager.
- Go to the Business setting from the left panel.
- Click “Business Info” from the left panel..
- Choose “Everyone” from the drop-down of the “Two-Factor Authentication” tab.
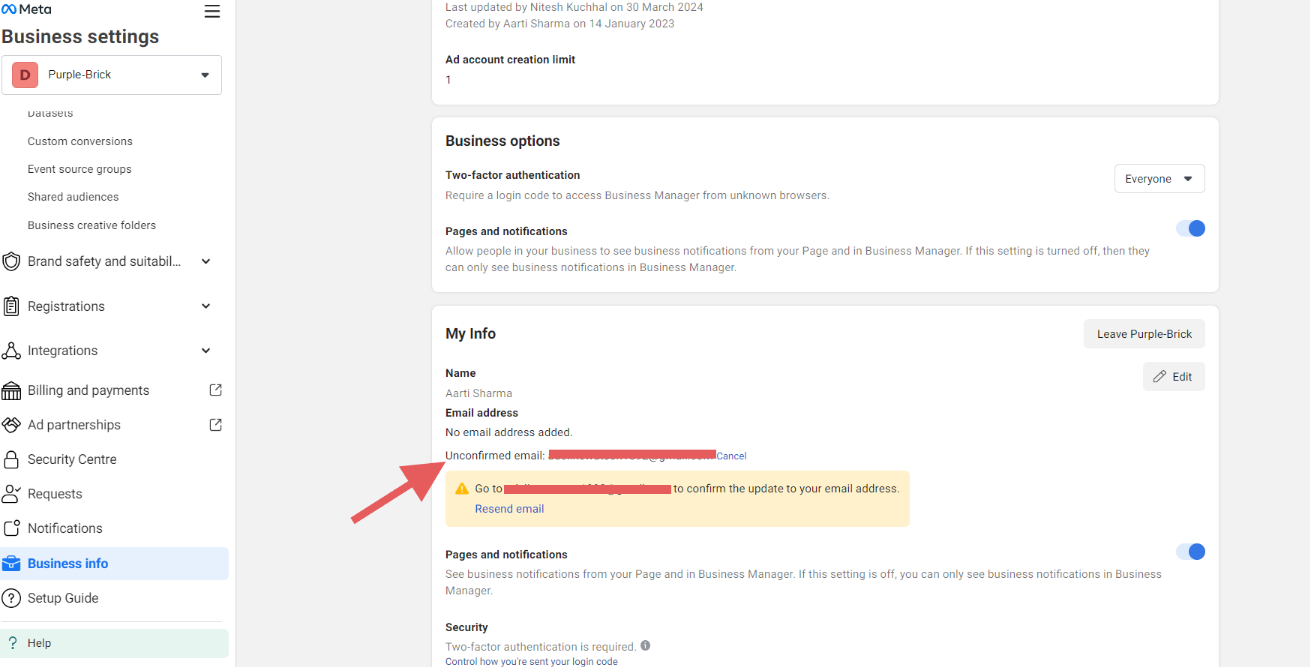
2. Make sure your email is verified. If not, do this before proceeding ahead.
- If the “Email Address” section shows “Unconfirmed email” as shown in the screenshot below.
Then please verify it.
***Note – A screenshot of verified email (For reference)
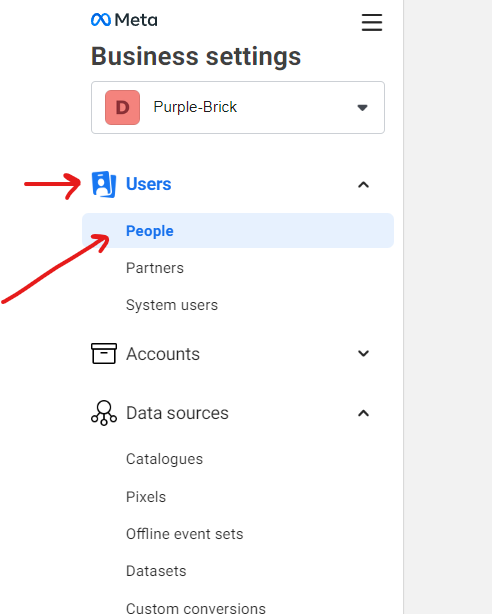
Give access to Yourself (Additionally, included the steps for adding any other person to your BM)
- Open the “Business setting” of your Business Manager. Then go to “Users”.
- Click on “People”.

- Click the “Invite People” tab available in the top right side.

- Now you will have a pop up box where you need to enter your email id.


- Now you will see a new box where you can see different types of access.
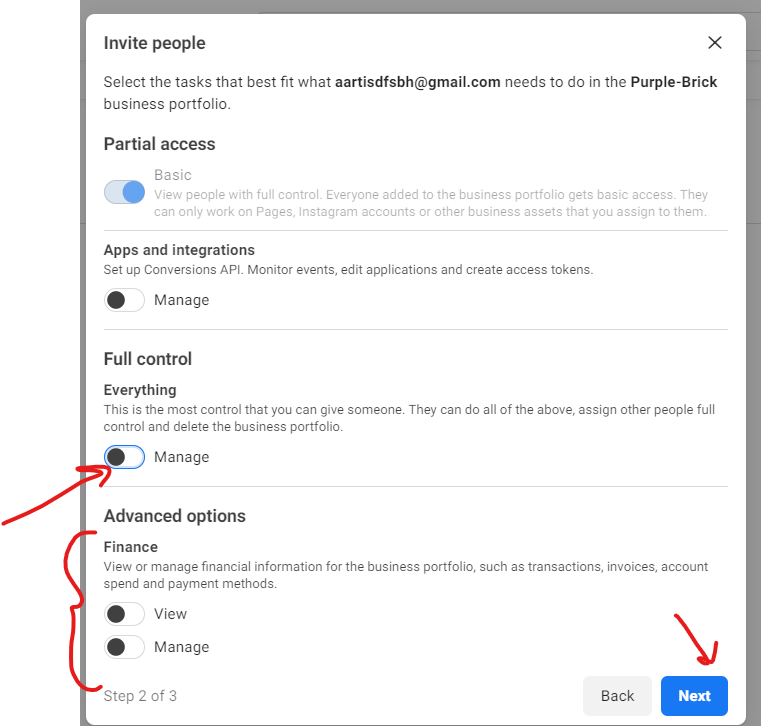
***Make sure you enable the “Everything” tab available in the “Full Control” section and “Manage” tab of the “Finance” section too for yourself.***
- Then you will see a new pop box where you can see different FB assets (Page, Ad account, Dataset ect) in the left panel.
Select the necessary ones along with the access type from the right side. And then click on the “invite” tab. (This step is required when you add someone else in your BM).
Note – In Recommended set up, we advised you to run the ads with the “Personal Ad account” which is linked to Facebook profile. But if you are doing an Advance Setup, then we recommend creating a new Ad account.
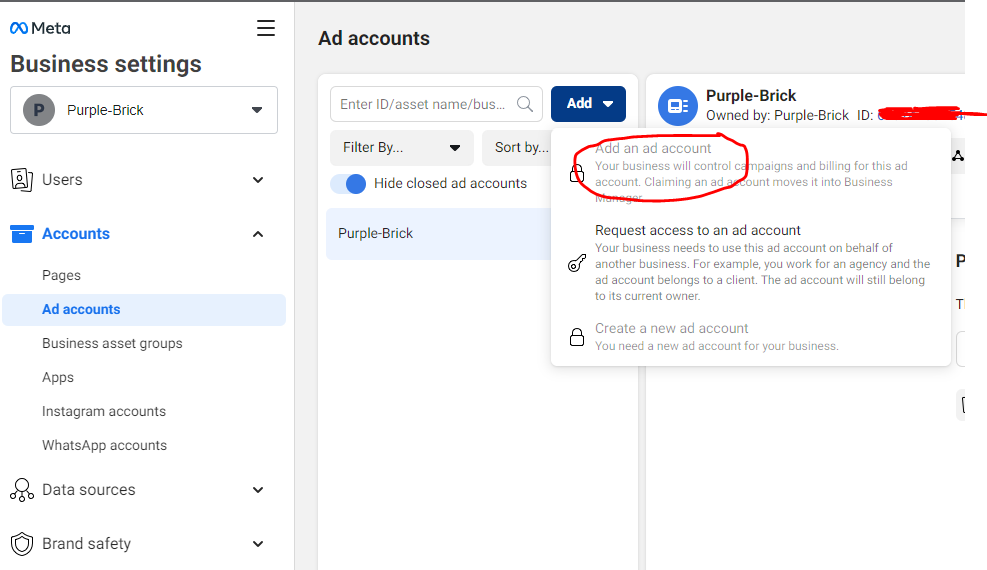
A) If you already have an “Ad Account” then connect it to your BM
- Open Business Manager and then select ‘Business settings’.
- Click ‘Accounts’ from the menu on the left-hand side menu. Then, click ‘Ad accounts’.
- Click the blue ‘Add’ drop-down menu.
- Choose “Add an ad account”.
- Then enter the Ad account ID and click on the “Add Ad Account” blue button.

How to Find Ad account ID
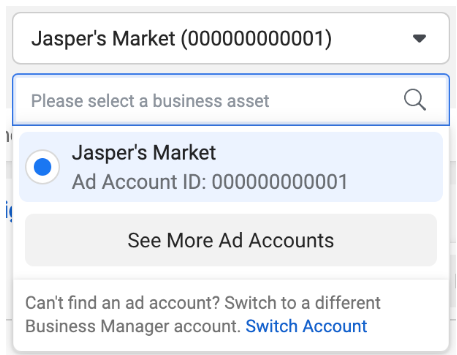
One way – Find your ad account ID (account drop-down menu)
- Go to Ads Manager.
- Your ad account ID number is shown above the search and filter bar in the account drop-down menu.
Another Way – Find your ad account ID in the address bar
- Go to Ads Manager.
- Find the number in your browser’s address bar. If you have trouble with locating your ad account ID in the address bar, look for act= in the URL.
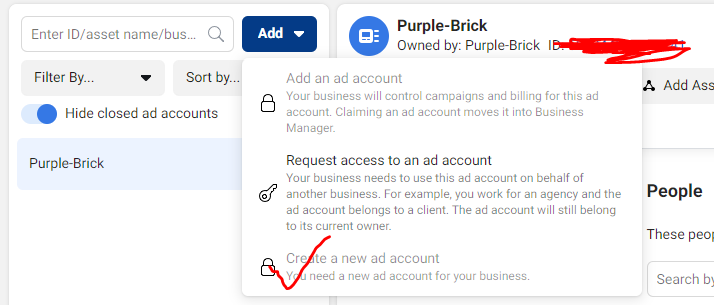
B) Or Else Create a New Ad account
- Open Business Manager and then select ‘Business settings’.
- Click ‘Accounts’ from the menu on the left-hand side menu. Then, click ‘Ad accounts’.
- Click the blue ‘Add’ drop-down menu.
- Select “Create a new ad account”.
- Now a pop-up box will appear where you need to add “Ad account name”, and choose Time zone & Currency.

- Another pop-up will come like
- Choose My Business and hit the “Create” button.
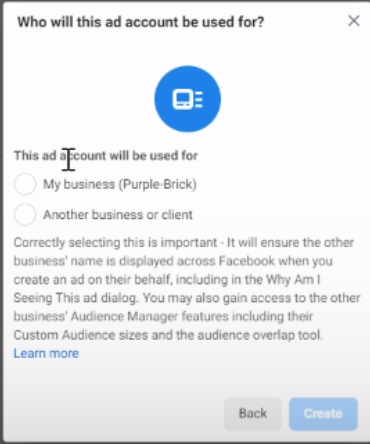
C) Give Ad account access to yourself.
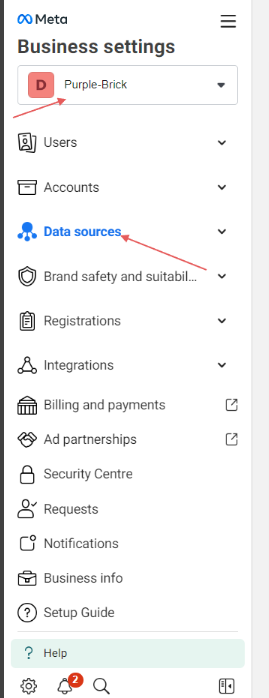
- Go to Business Settings in Business Manager. Then select your business.
- Click Data sources.

- Select Datasets.
- Click on “Add” by the search bar at the top of the page.
- Enter “your website name” as your Dataset name.

- Click on the Create button and you’re done.

Assign Access to Yourself
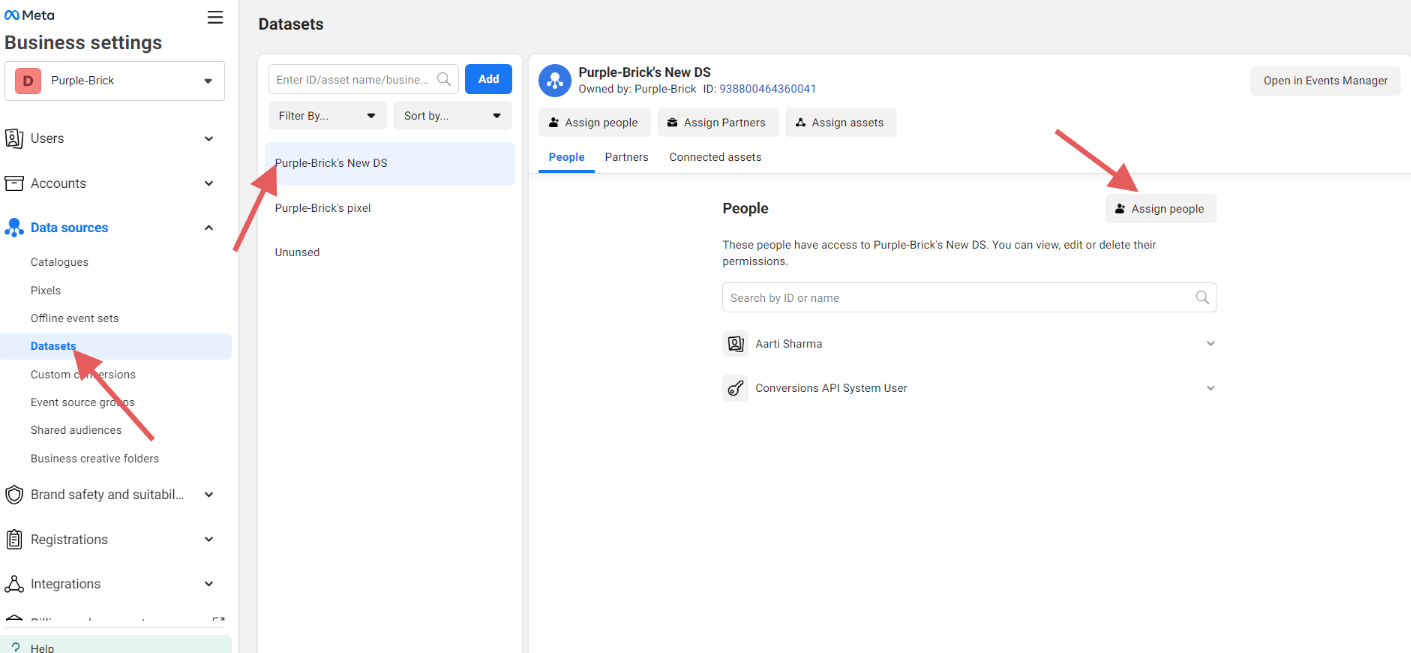
- Go to Business Setting. Then click on ‘Data Source’ from the menu on the left-hand side menu. Then, click ‘Datasets’.
- Now make sure you select the correct “Dataset” if you have many.
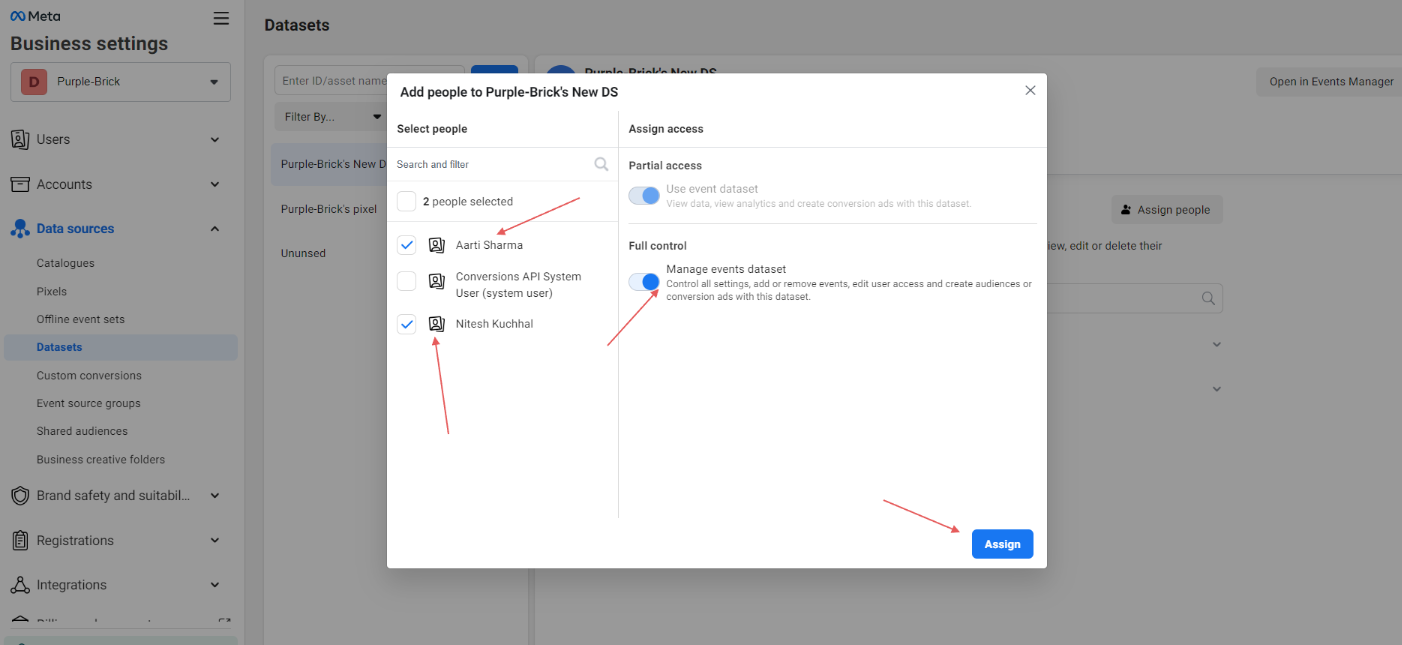
- Click on “Assign people”.

- A new window will appear. Then select “Your name”, enable the “Full Control” tab and click on the “Assign” button.

- You are all set!
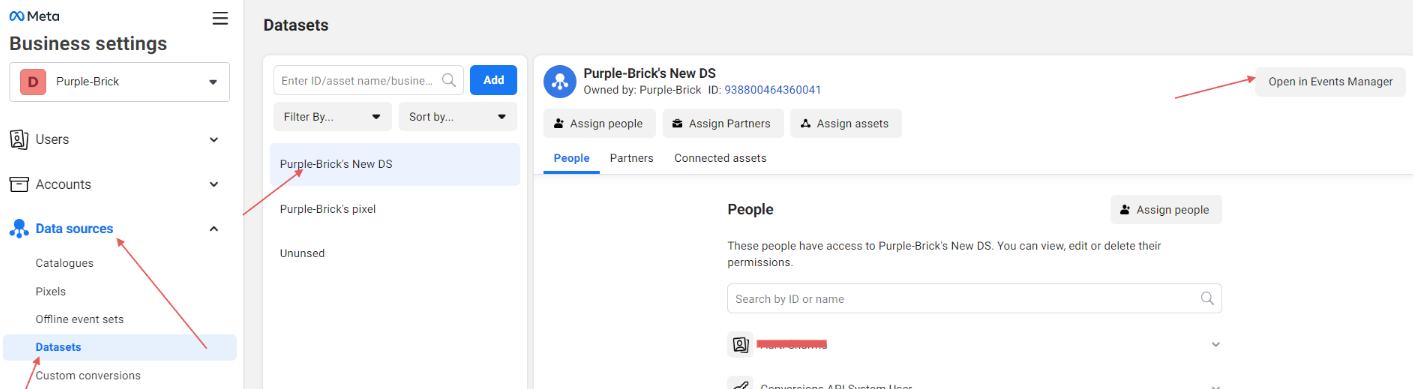
Connect the Dataset to the Ad account
- Go to Business Setting. Then click on ‘Data Source’ from the menu on the left-hand side menu. Then, click ‘Datasets’.
- Now make sure you select the correct “Dataset” if you have many.
- Click on “Assign assets”.
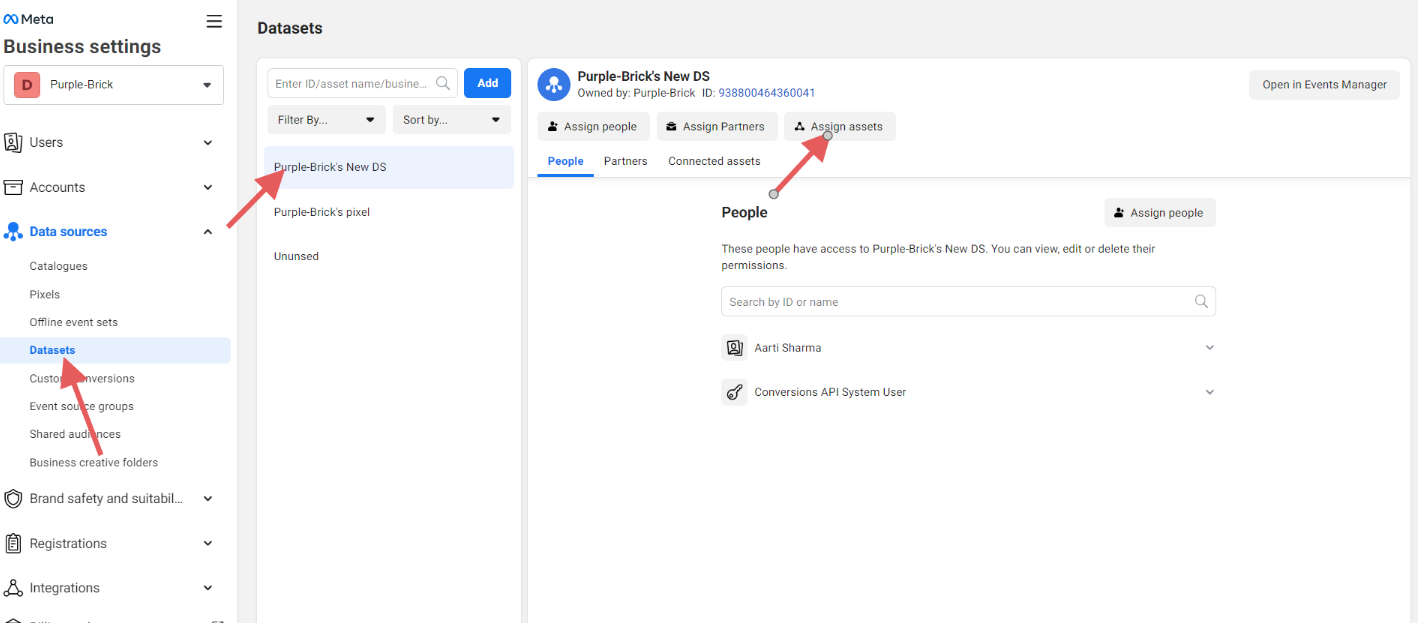
- A new window will appear. Then select the ad account and click on the “Add” tab.
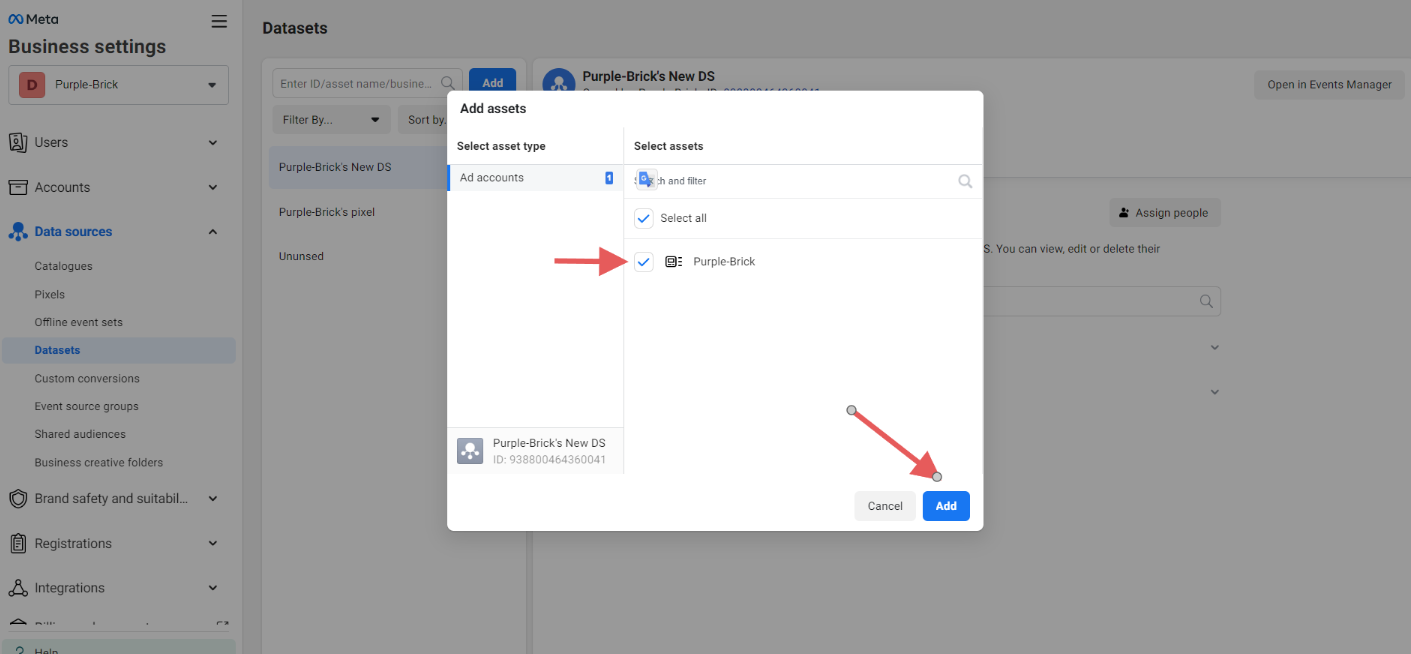
- You are all set!
- Log in to your Google Tag Manager account.
- Select your website’s container and click Add a new tag.

- Click on “Tag Configuration”.

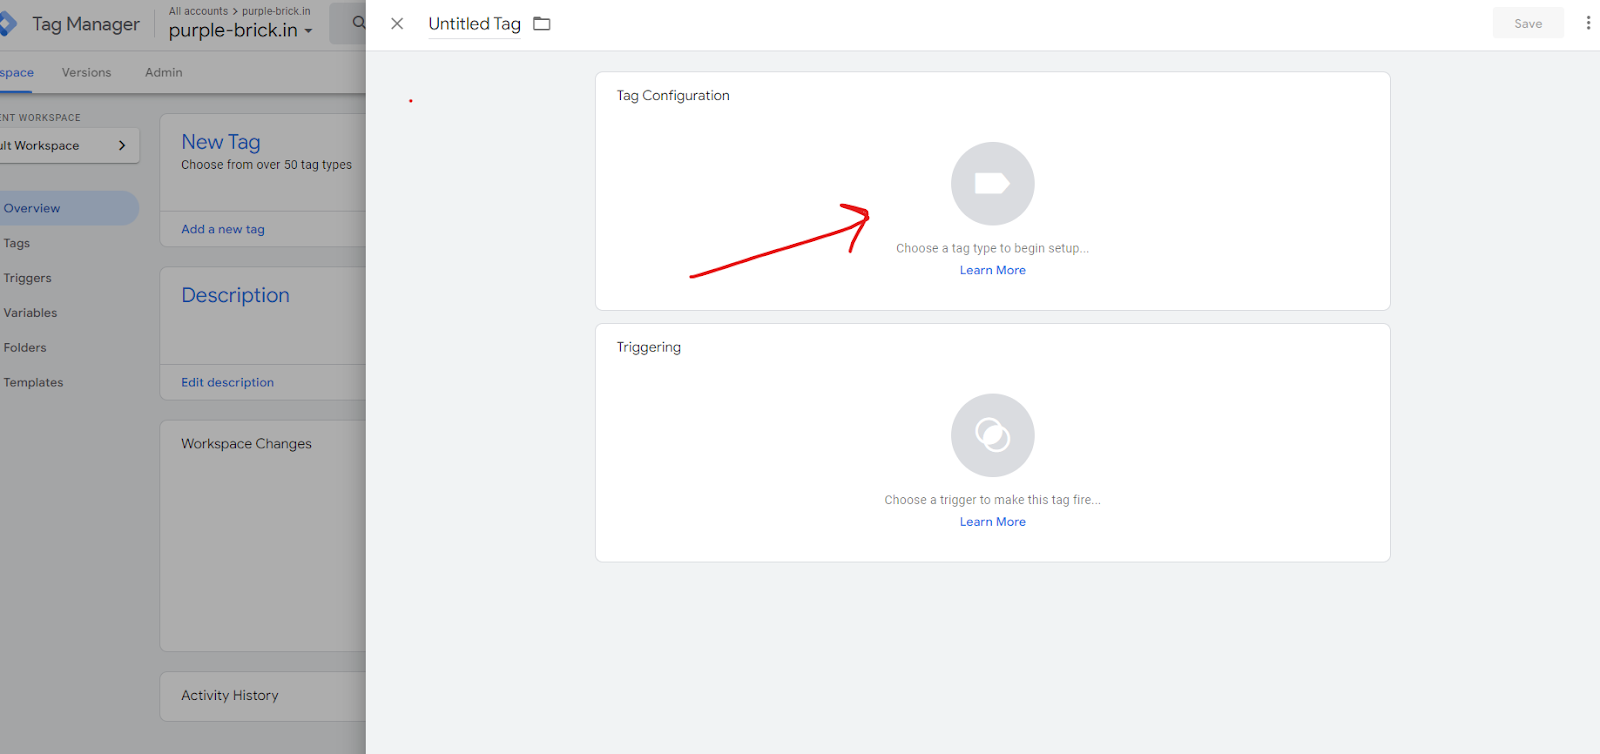
- Search for “Customer HTML” and click on it.

- Now go to the Business Setting of “Business Manager”. Then Select “Datasets” from the “Data Sources” drop down.
- Select the Dataset and open Events Manager.

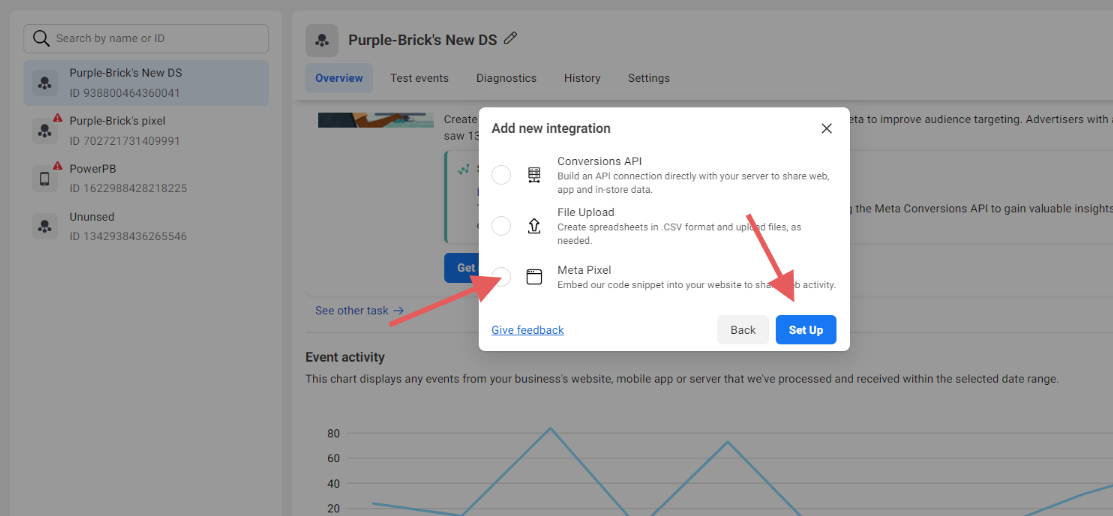
- Click on the “Add Events” tab and then select “Add new integration”.

- Now click on “Meta Pixel” and hit “Set Up”.

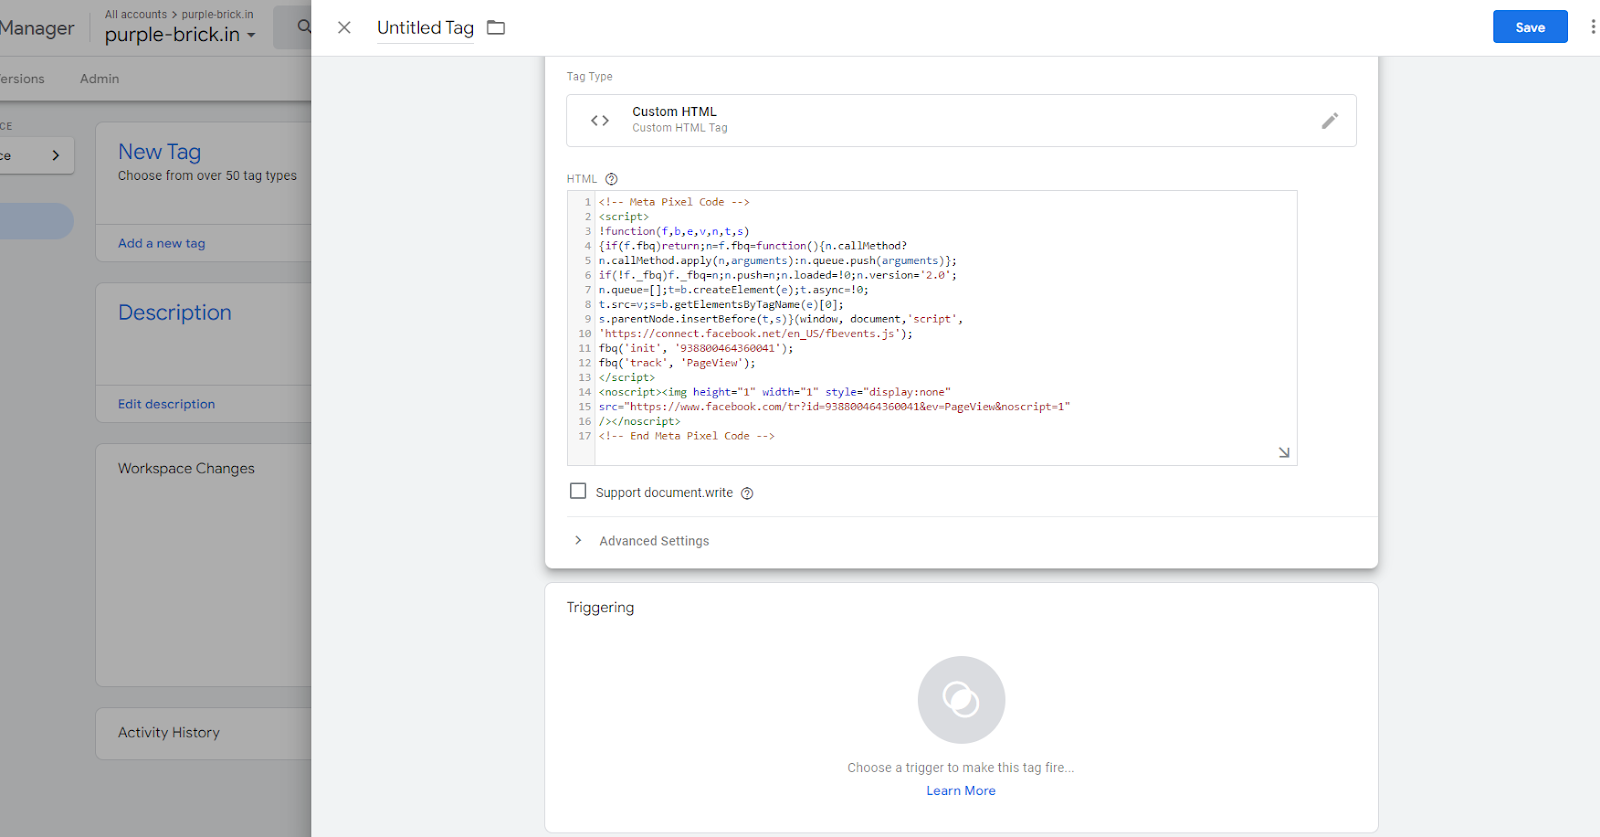
- Click on the first “Manually Add Code to Your Website” option. And then “Get Started”.

- Now click on “Copy code” to copy the entire pixel base code.

- Return to Google Tag Manager and paste the code in the “Custom HTML” container.


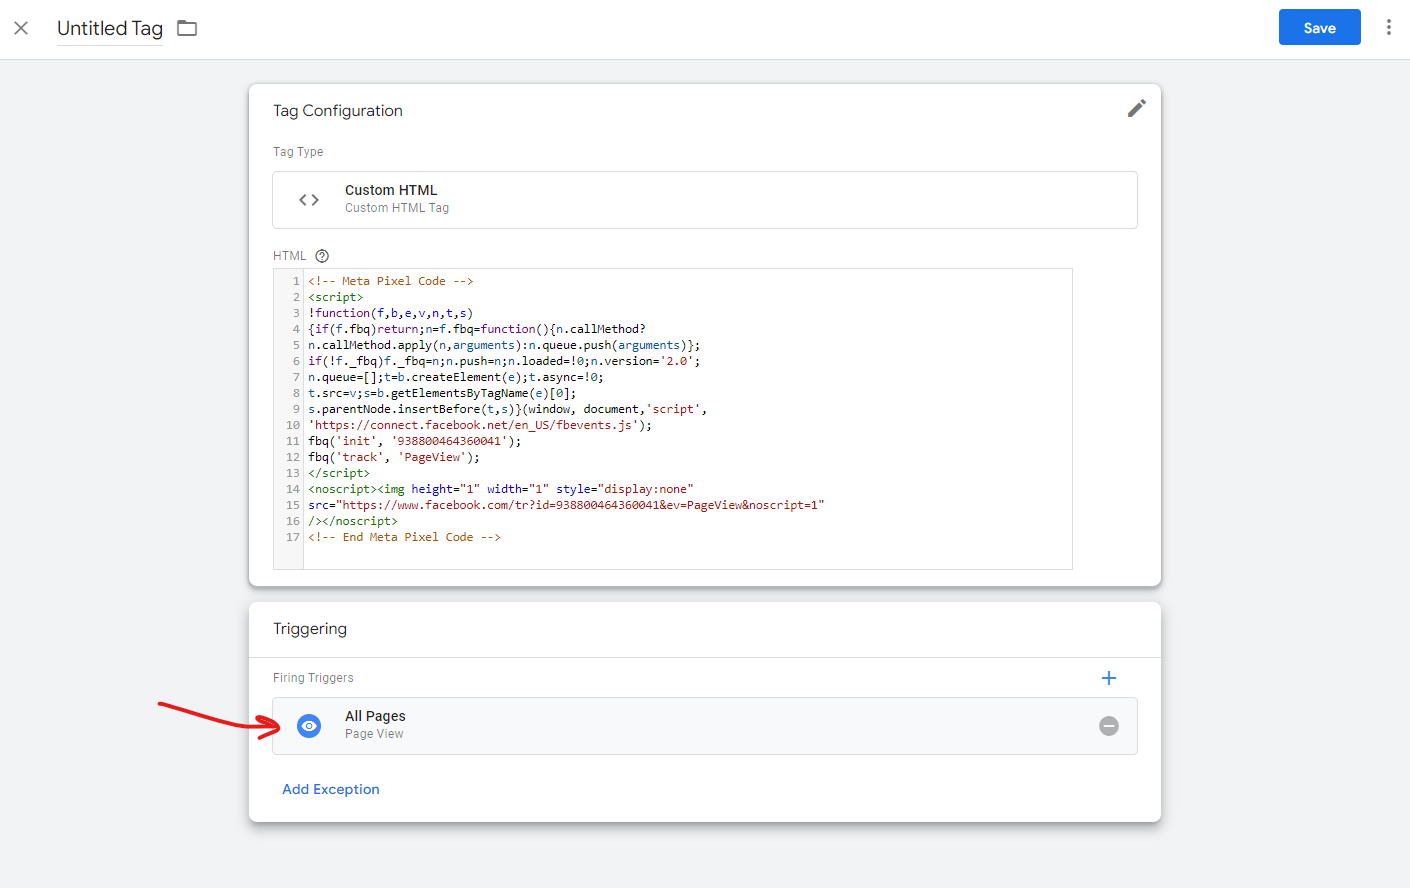
- Click on “Triggering” and then select “All Pages” as shown below screenshots.

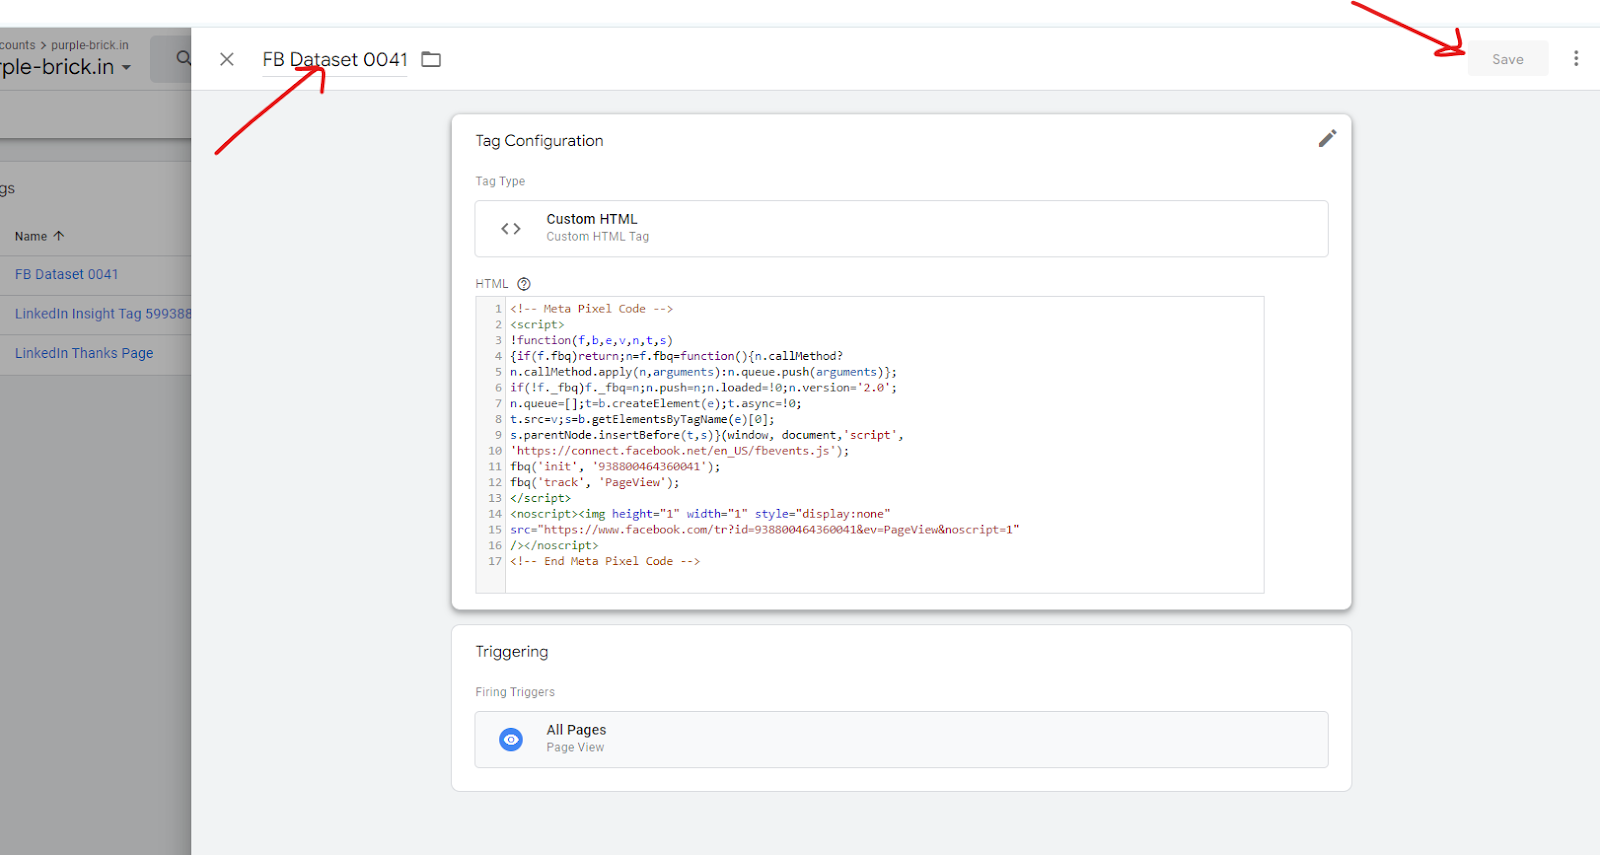
- Now name your tag and click on save.

- Click on Submit then Publish and you are all set.

Check Whether Dataset is firing or not (With “Meta Pixel Helper Chrome Extension”)
Watch the video to understand the process.
About Facebook Events
Watch the video to understand the process.
- How to create different types of Events in FB (1. If someone fills the form and goes to thank-you page and 2. If someone click on any button)
- How to test the Events.
- How we can see these Events while creating the Campaign on FB.
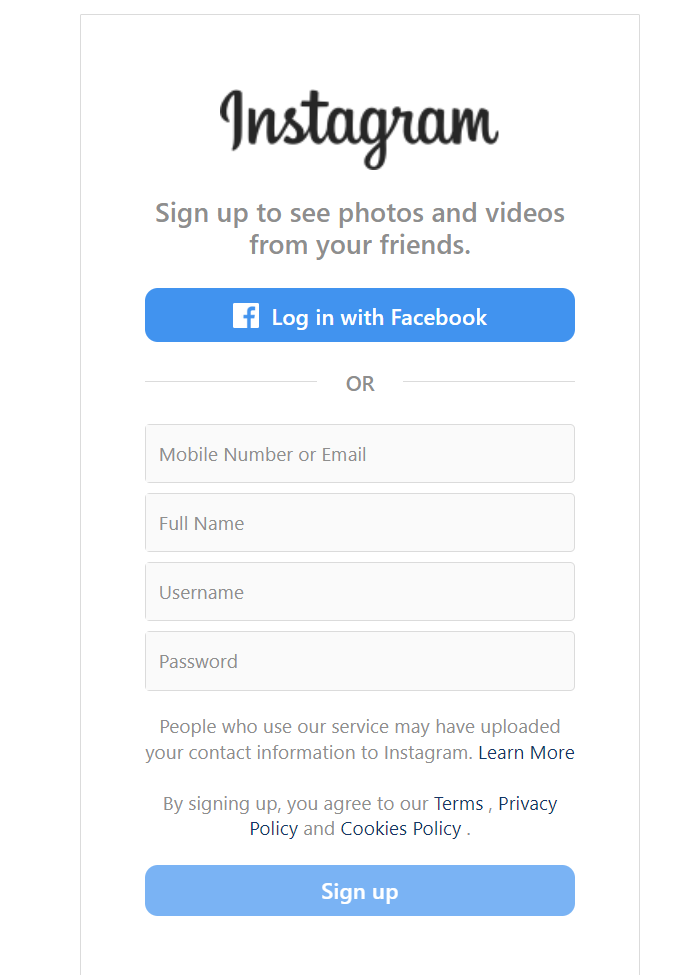
- Go to www.instagram.com/accounts/emailsignup/
- Fill In the Information shown in the screenshot. Make sure to use “business name” as Full Name.
3. Enter your DOB and then 6 digit OTP…You are all set

4. You are all set! Your account is created.

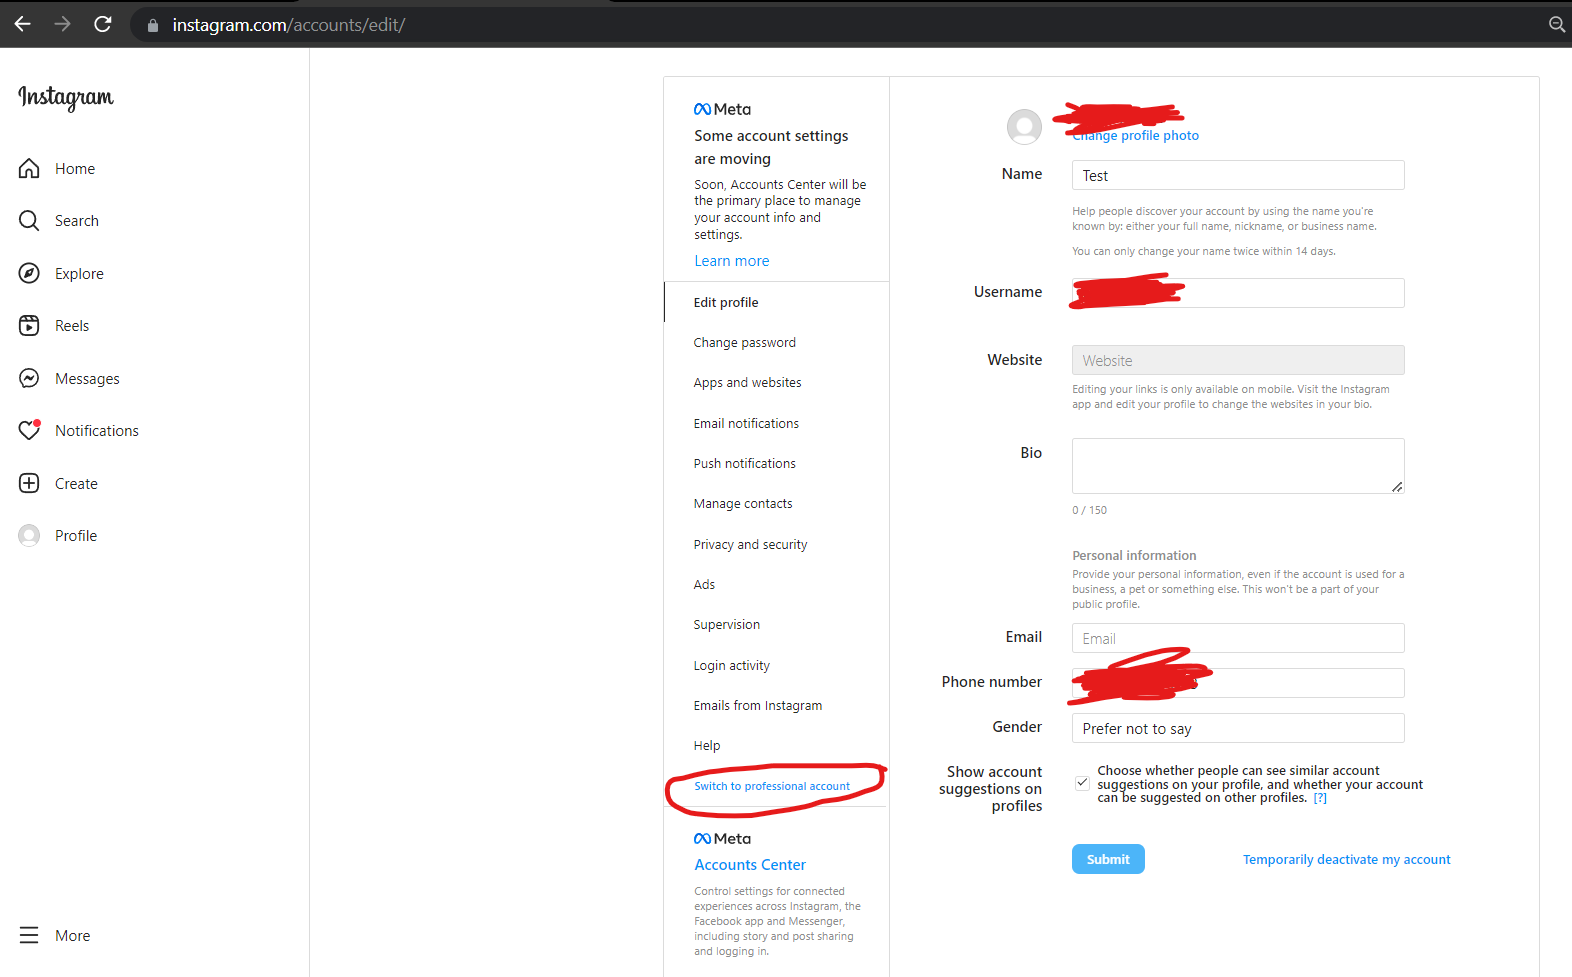
- Go to your profile.

2. Click on Edit Profile to access the menu.

3. Enter business bio (explain your business along with some call to action), email id..And then Save it..
4. Now tap “Switch to Professional Account.”
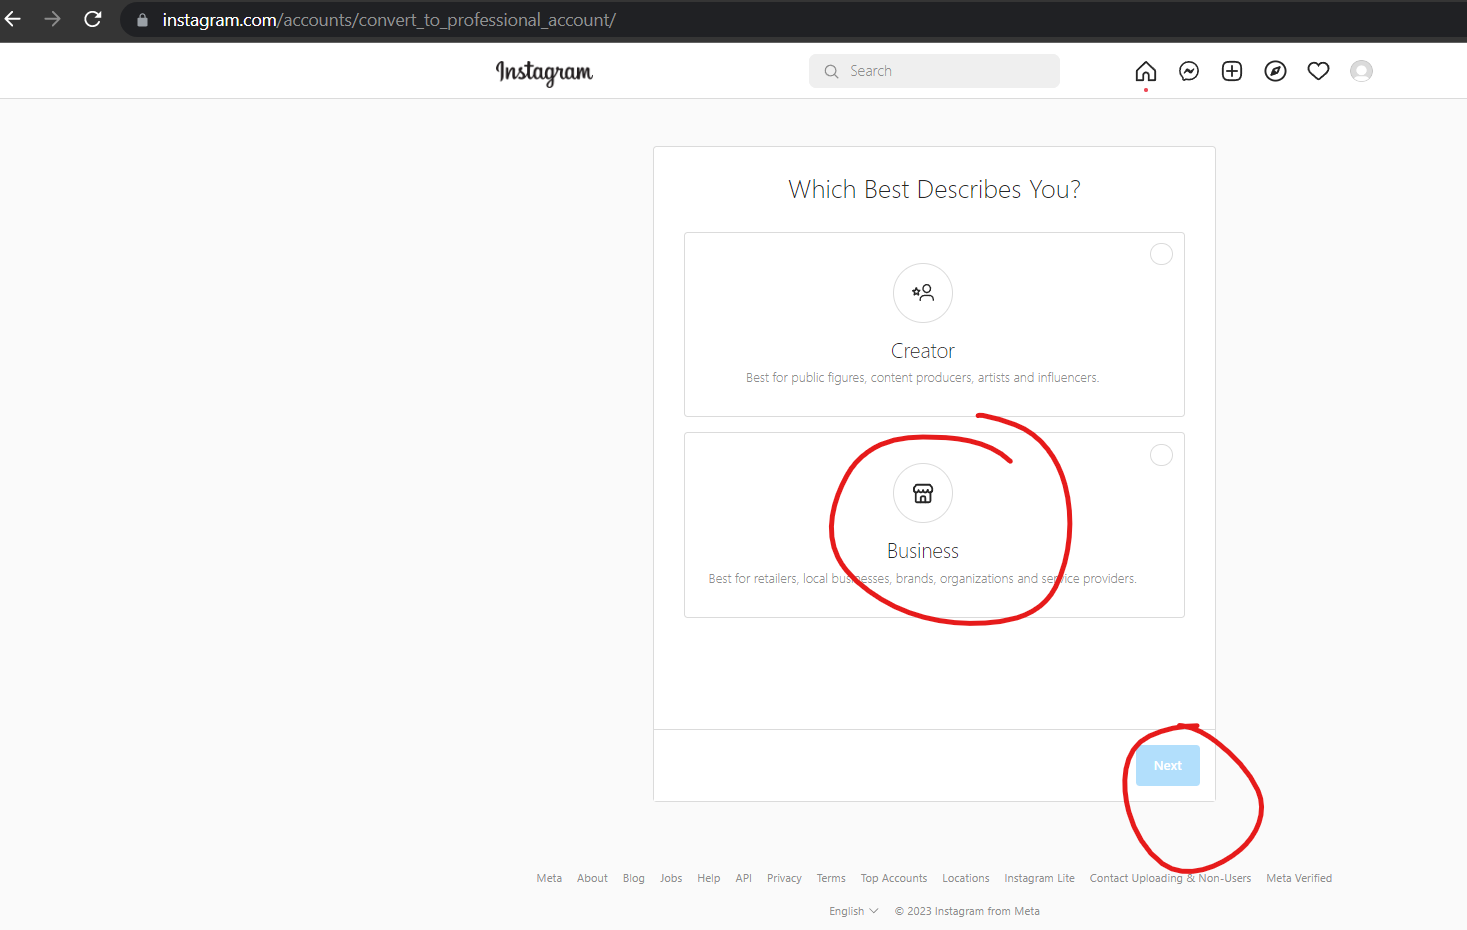
5. Choose “Business” as the account type and click on Next.
6. Again Next.

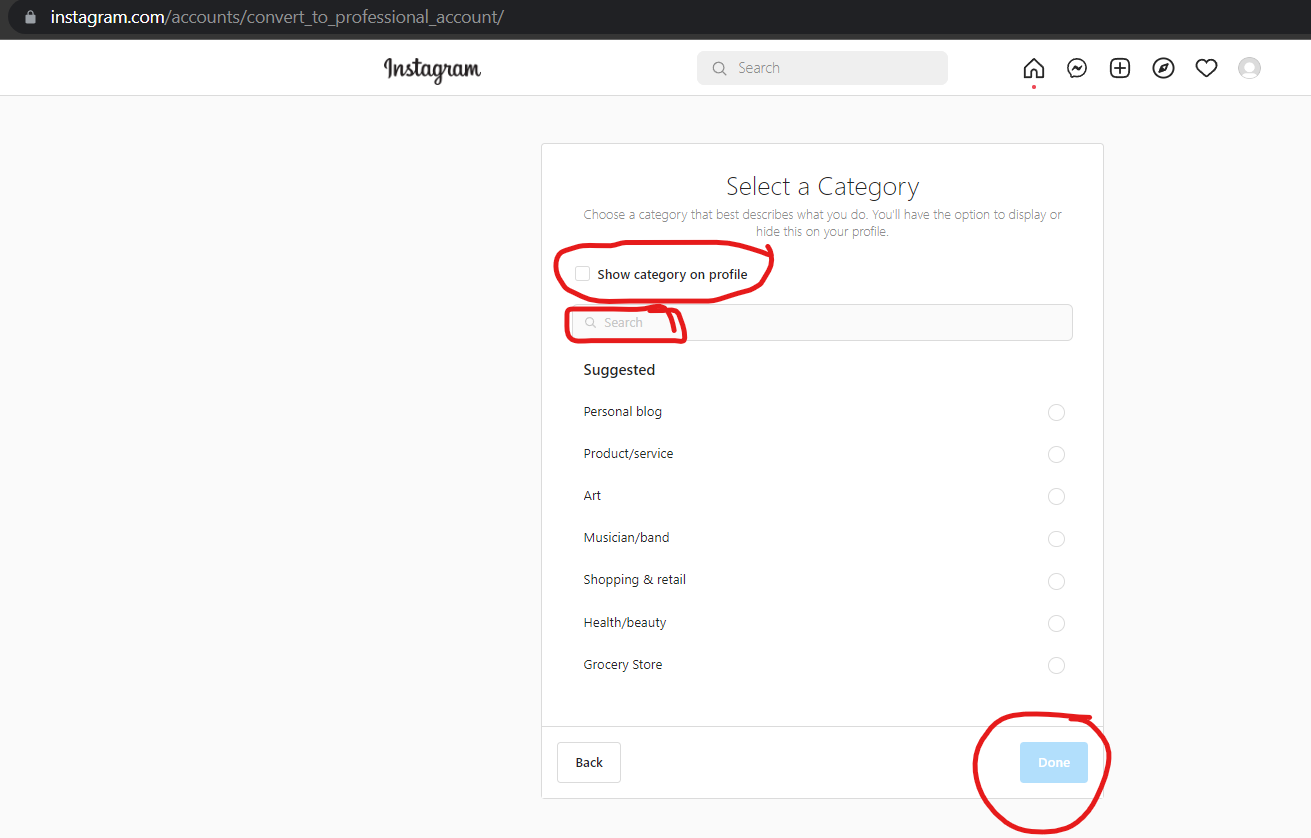
7. Search for the relevant business category and check the box of “show category on profile” tab.. and then save..
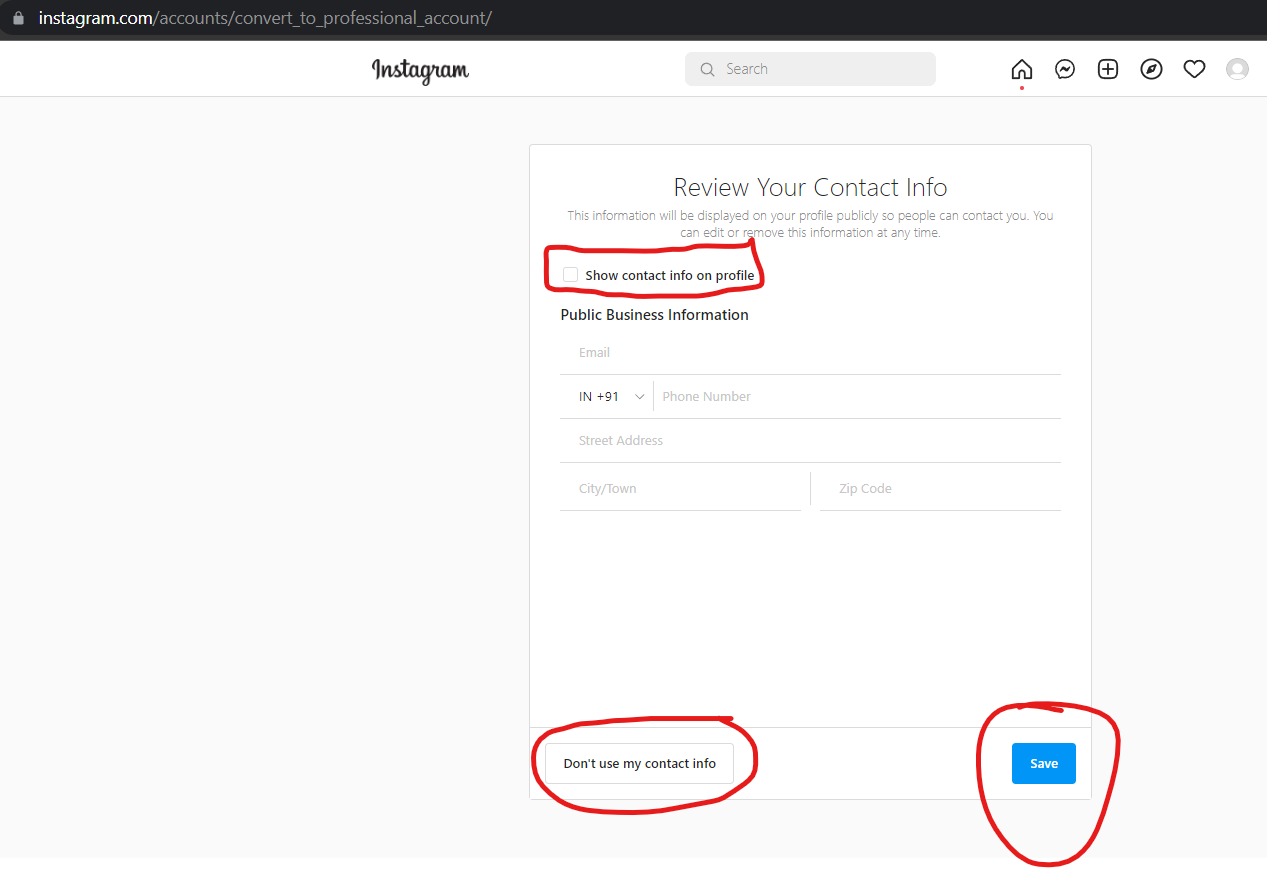
8. Now there are 2 options –
- A – Directly click on “Don’t use my contact info..And you are all set..
- B – Or else, add the contact information and tick the box “Show contact info on profile” and then save…You are all set…
9. You are all set..Add relevant business profile pic..
- Go to your Facebook Page
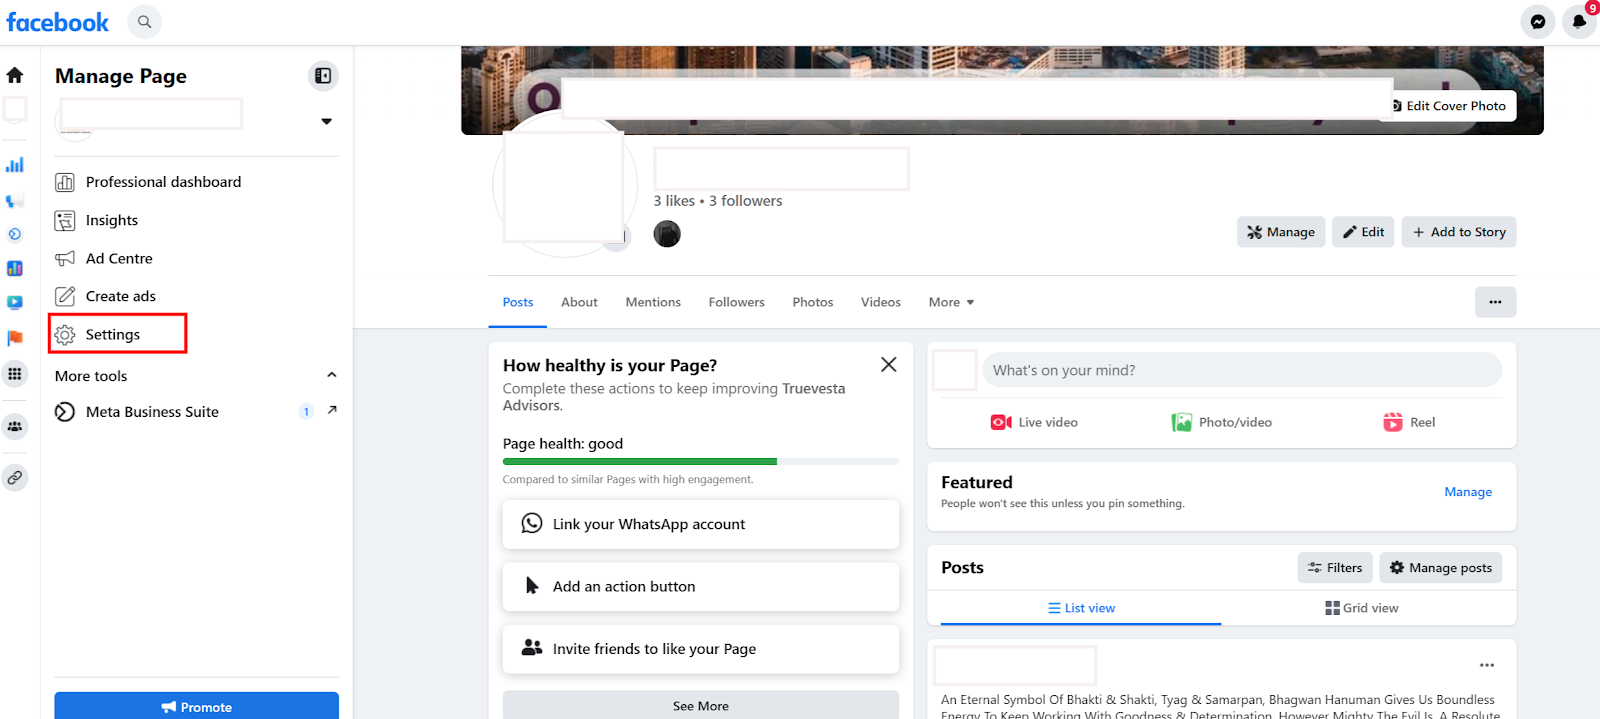
2. Click on Setting on left Side of Screen
3. Click On Linked Account
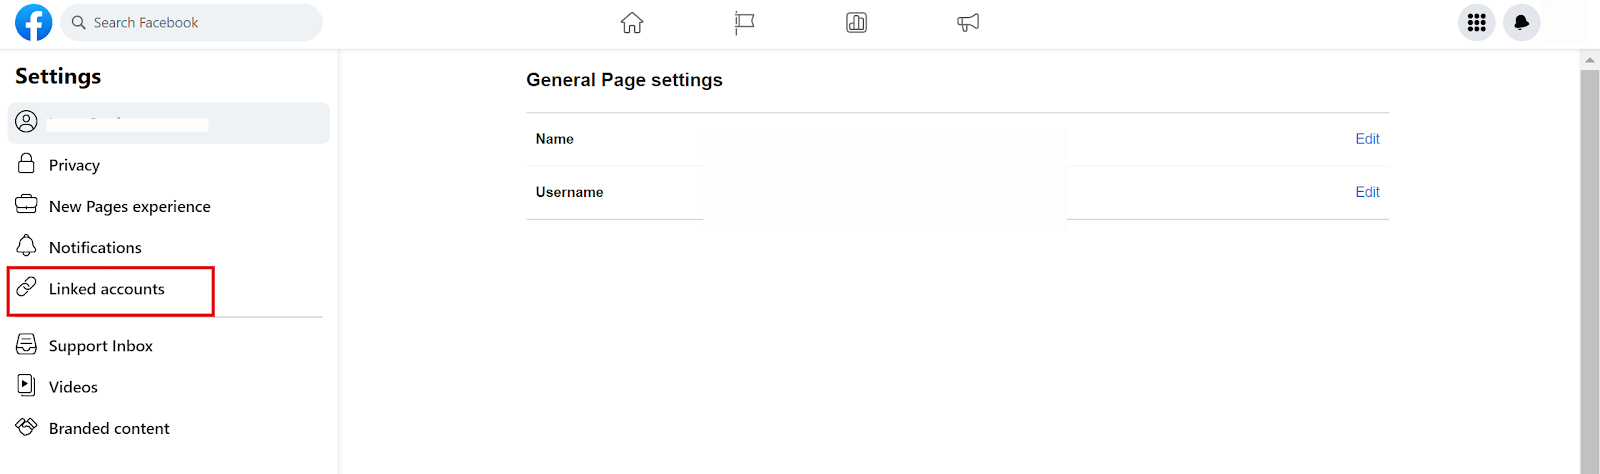
4. Select Instagram And Click on Connect Account

5. Click On Connect and Login to the Instagram Page which you have created.
6. That’s Set
Connect your Instagram Business Page to Facebook Business Manager
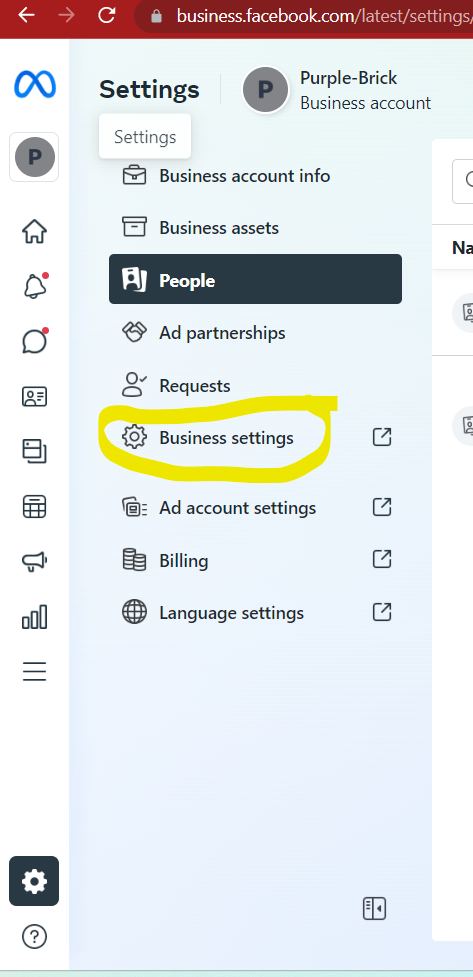
- Log in to your personal Facebook account and Go to https://business.facebook.com/
- Select Business Setting..
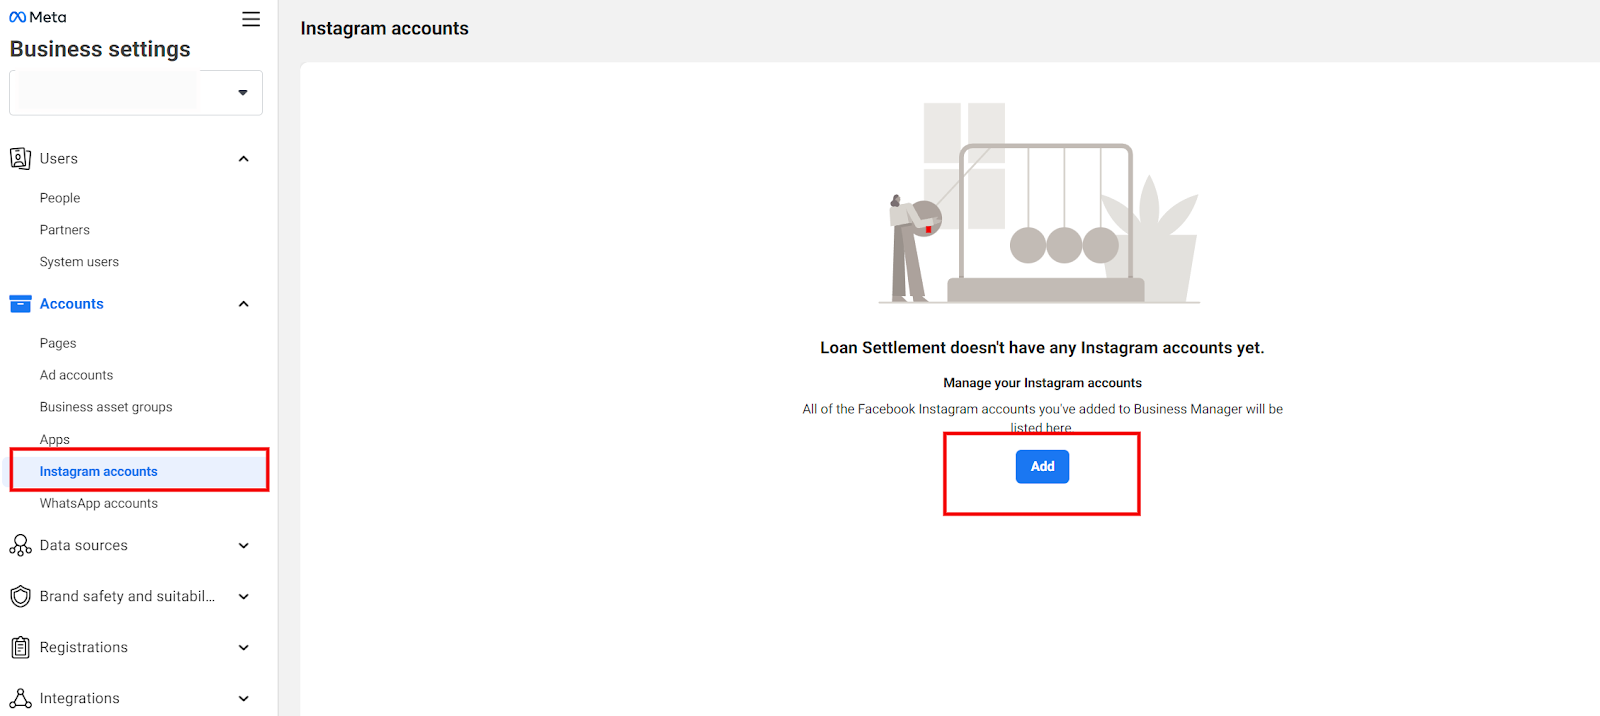
3. Select “Instagram Accounts” from “Account” from left panel…
4. Click on the blue “Add” button to add a new Instagram account.
5. Now you will see a pop up…
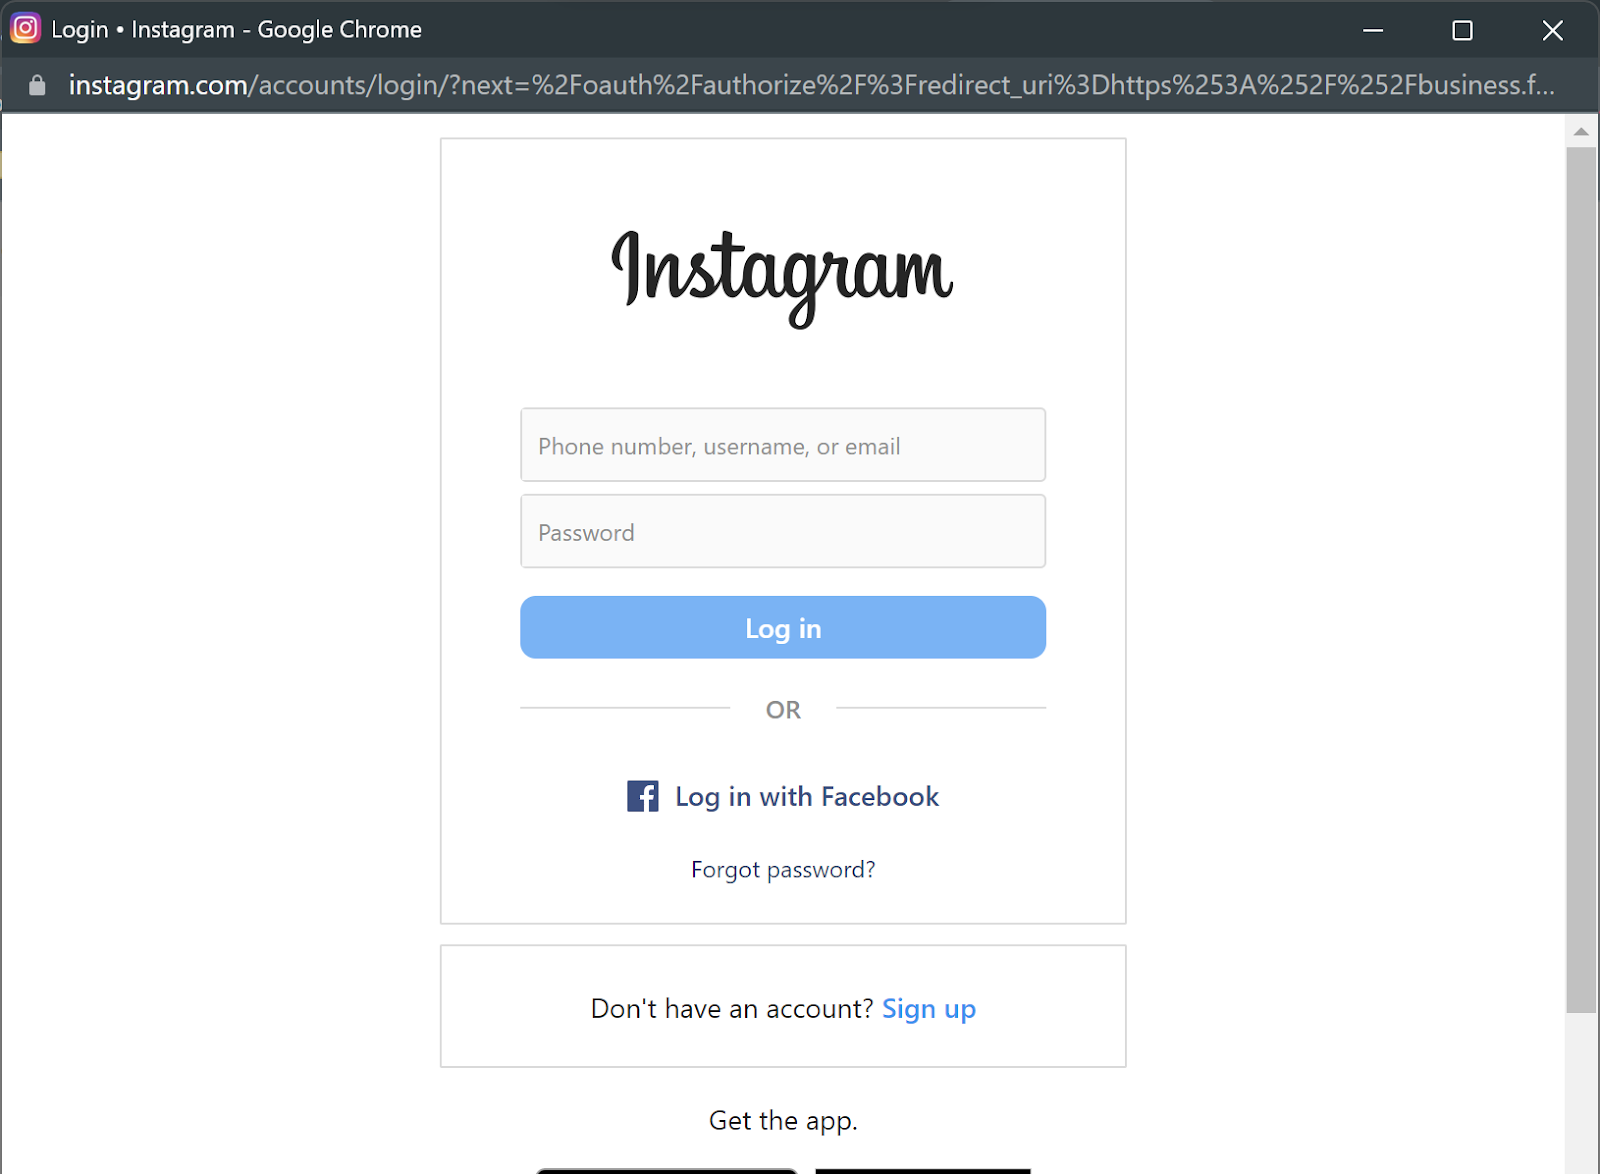
6. Click on “Connect Your Instagram Account” button….

7. Now enter your Instagram username and password.
8. Follow the prompts to complete the verification process and you are all set!
Note– Once the Instagram Page is connected to Fakebook BM then only you can share access to yourself via BM.
- Log in to your Business Manager account on Facebook.
- Click on the “Business Settings” button.
- Select the Instagram accounts tab from “Accounts” on the left-hand menu..

4. On the right side, you will see the “Add people” tab..Click on in and share the access..

A) Create a LinkedIn Insight Tag
- First, you need to generate a LinkedIn Insight Tag from your LinkedIn Ads account.
- Log in to your LinkedIn account and go to https://www.linkedin.com/campaignmanager/.
- You are on the “Ads account” that you just created.
- Now go to the “Analyze” tab from the left panel and select “Insight Tag” from the dropdown menu.
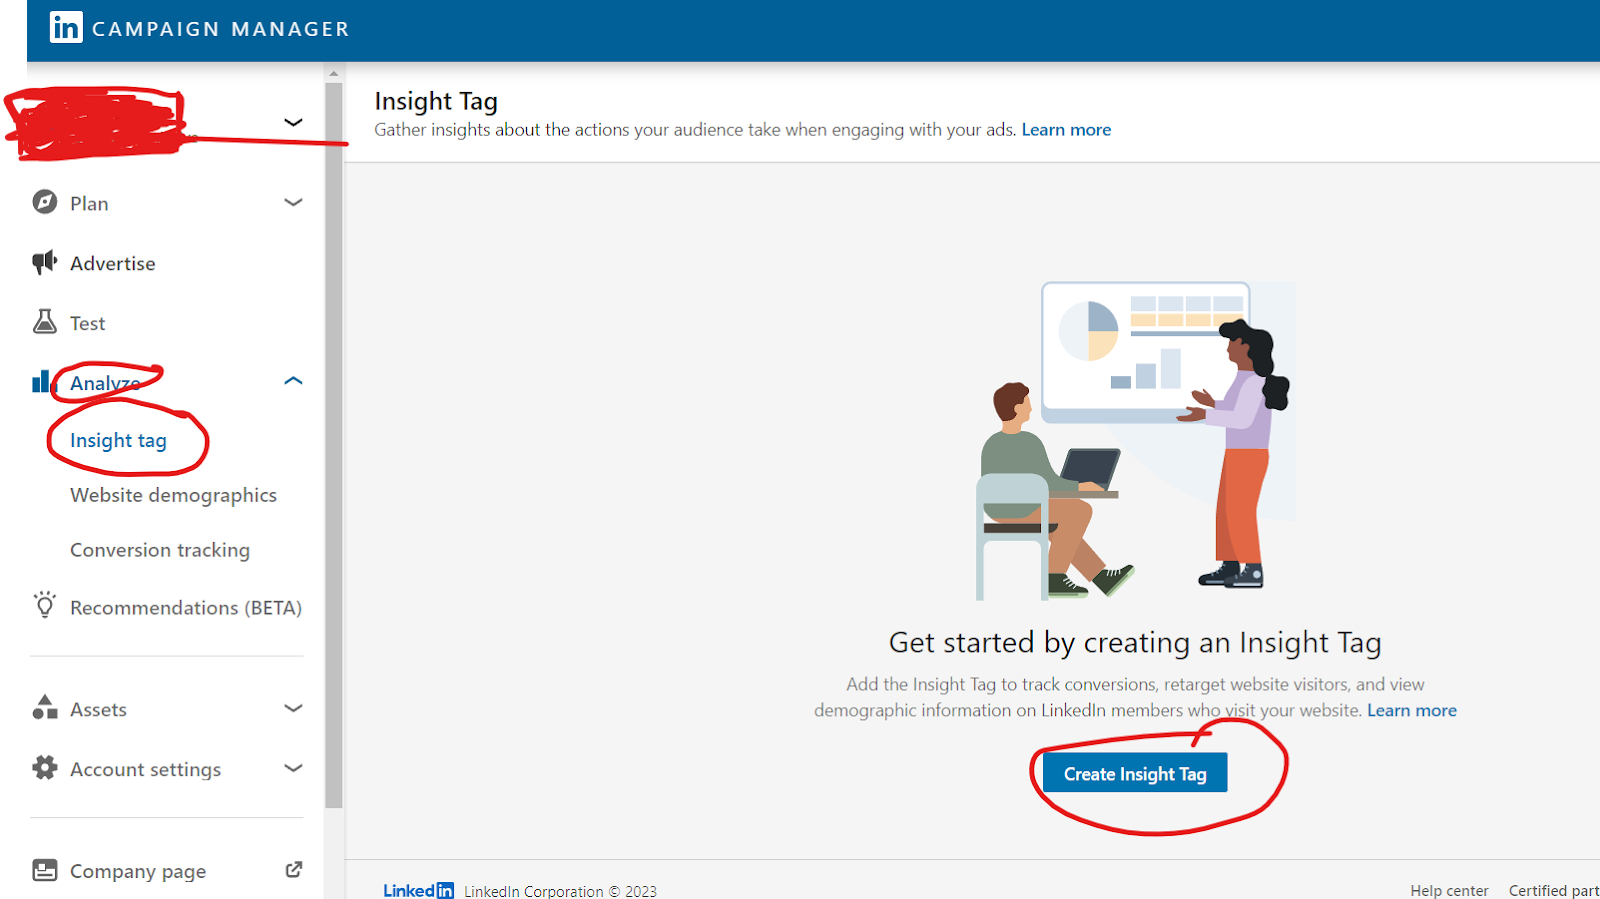
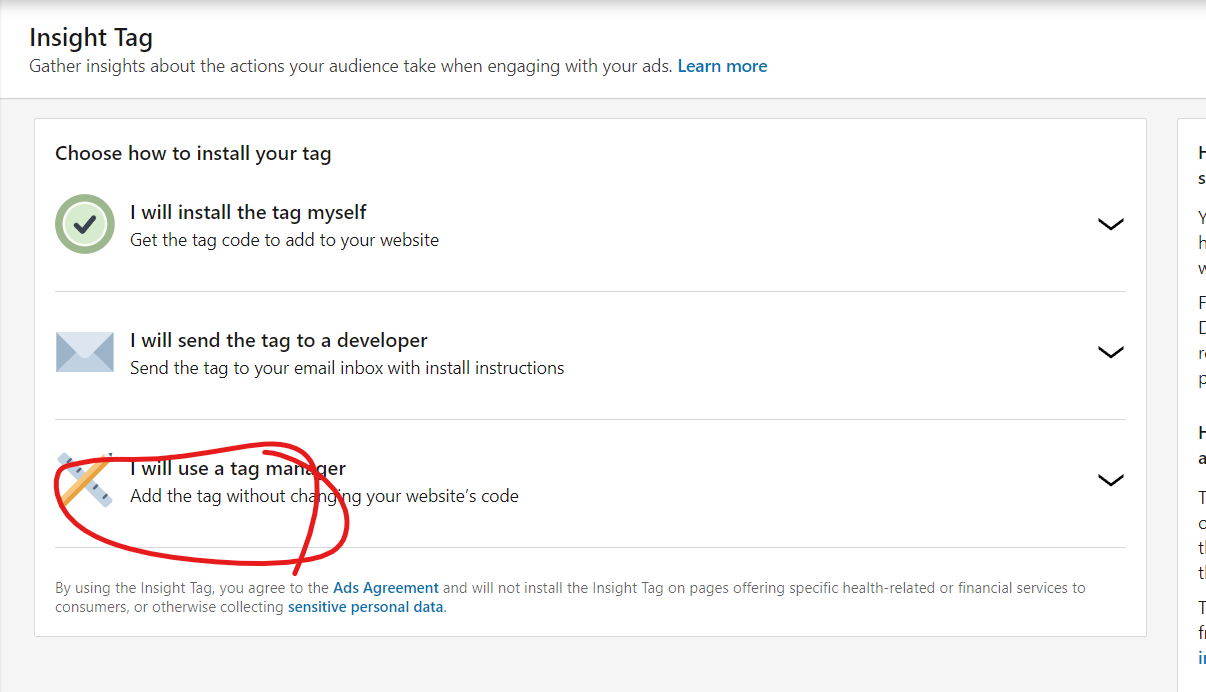
- You will see 3 options. Choose Tag Manager Code.
- Copy Your partner ID

B) Add “LinkedIn Insight Tag” to Website via GTM
- Go to tagmanager.google.com and sign in.
- Select your account and your container.
- In the New Tag box.

- Click Add a new tag.
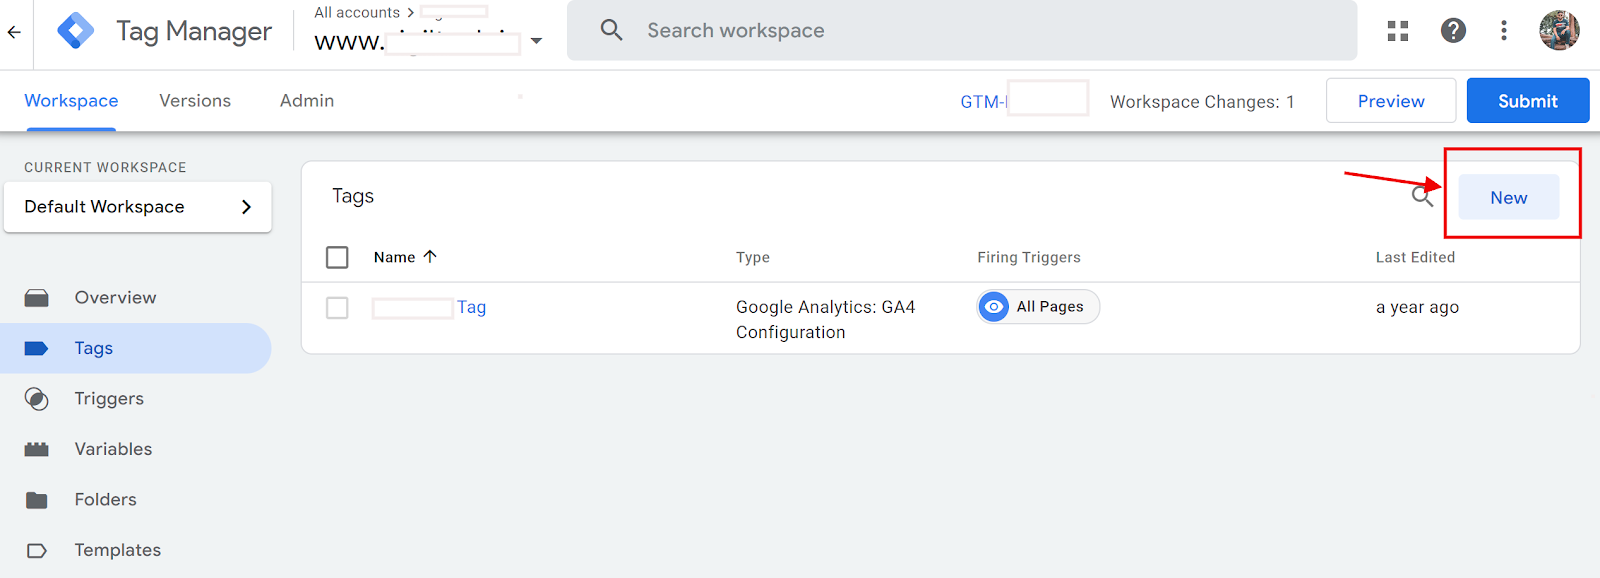
- Click Tag Configuration, then select Discover more tag types in the Community Template Gallery
- Search for LinkedIn InsightTag 2.0.

- Add the partner ID from your Insight tag into the Partner ID field.
(Partner ID copied from LinkedIn in Step 3 A)

- Add a trigger and click Add. To select all pages, click the checkbox next to All Pages.

- Rename Your Tag and Click Save.

- Once Tag Created then click Submit in the upper-right corner to publish your container version.

- Once you click on submit the click on publish button on the upper-right corner

- Then Click Skip, And That’s Set!
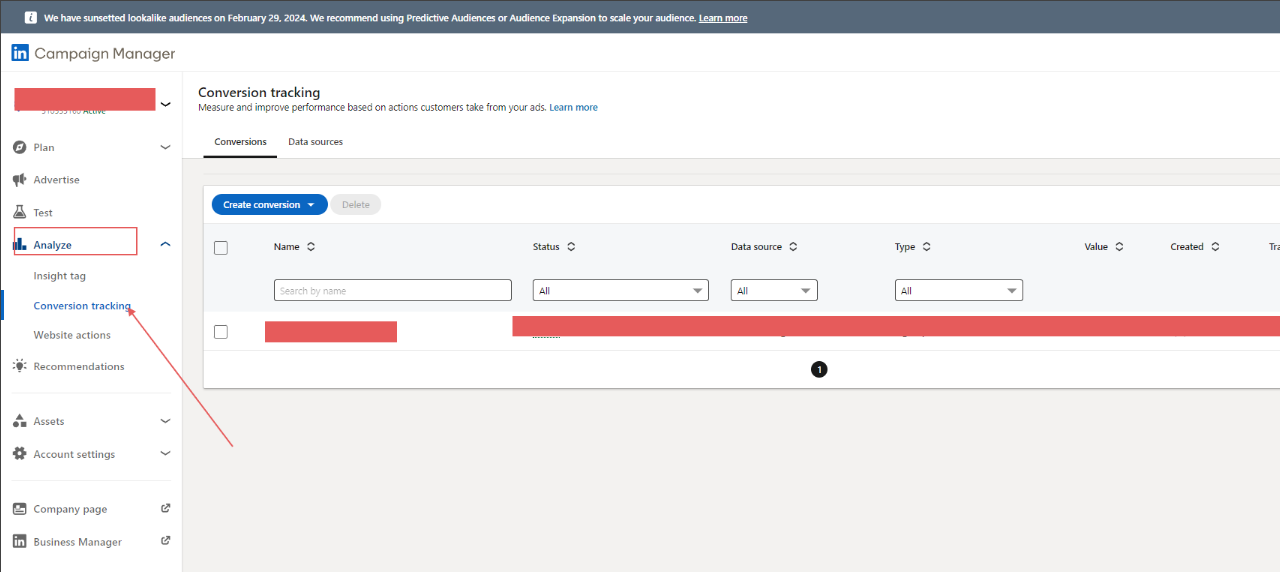
- Login to your “LinkedIn Ad account” and navigate to the “Analyze > Conversion Tracking” tab.
 2. Click on the “Create conversion“ button and select “Insight Tag conversion“ from the dropdown menu.
 3. Now name the conversion as “Thank You Page” and Select “Lead” as “Conversion Behaviour” from the dropdown.
 2. Click on the “Create conversion“ button and select “Insight Tag conversion“ from the dropdown menu.
 3. Now name the conversion as “Thank You Page” and Select “Lead” as “Conversion Behaviour” from the dropdown.
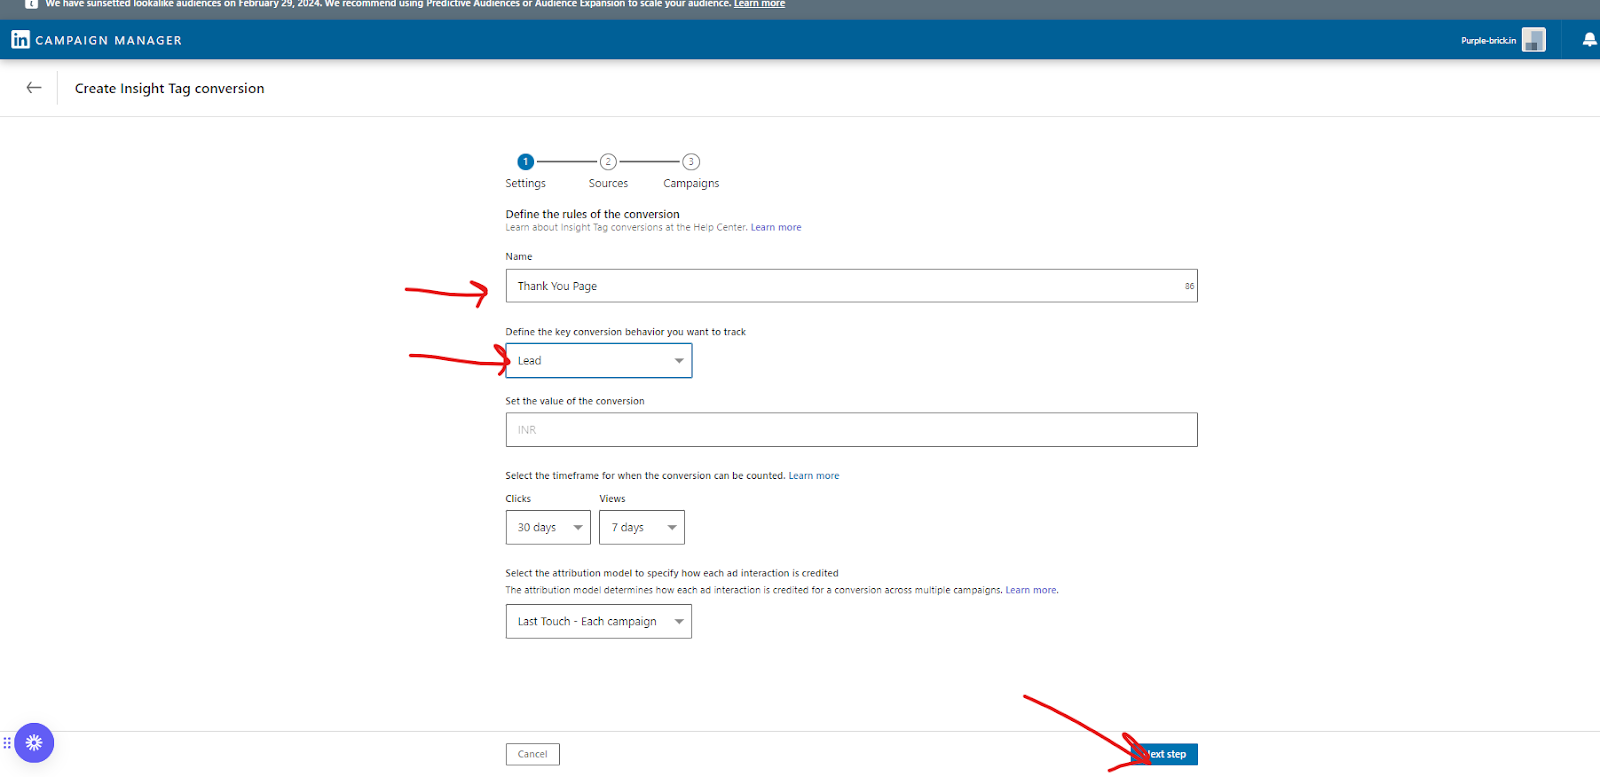
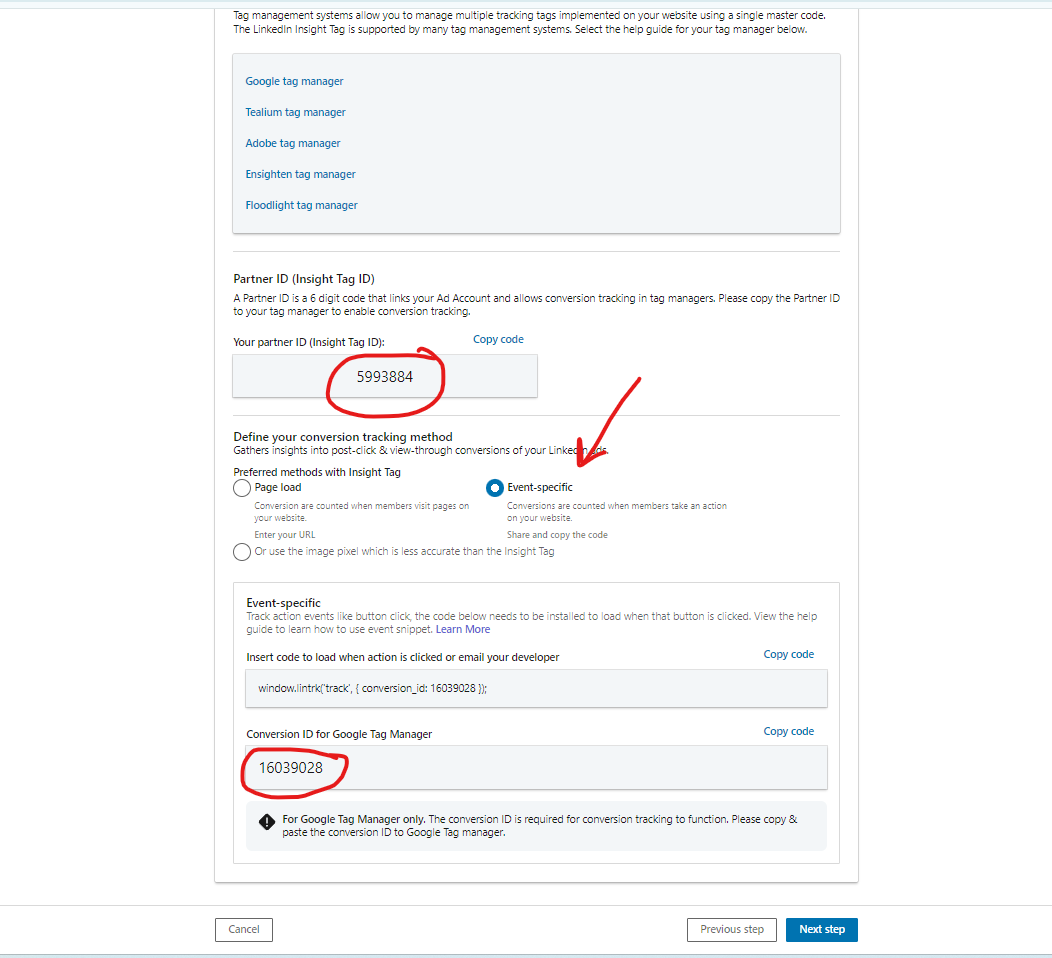
- Select “Tag Manager”.
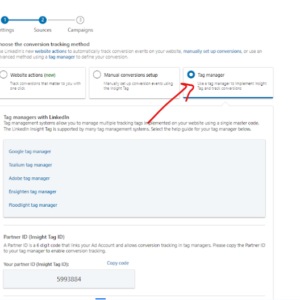
- Now select “Event Specific”. Copy the “Partner” and “Conversion” Id. And then open GTM.
- Click on New Tag.
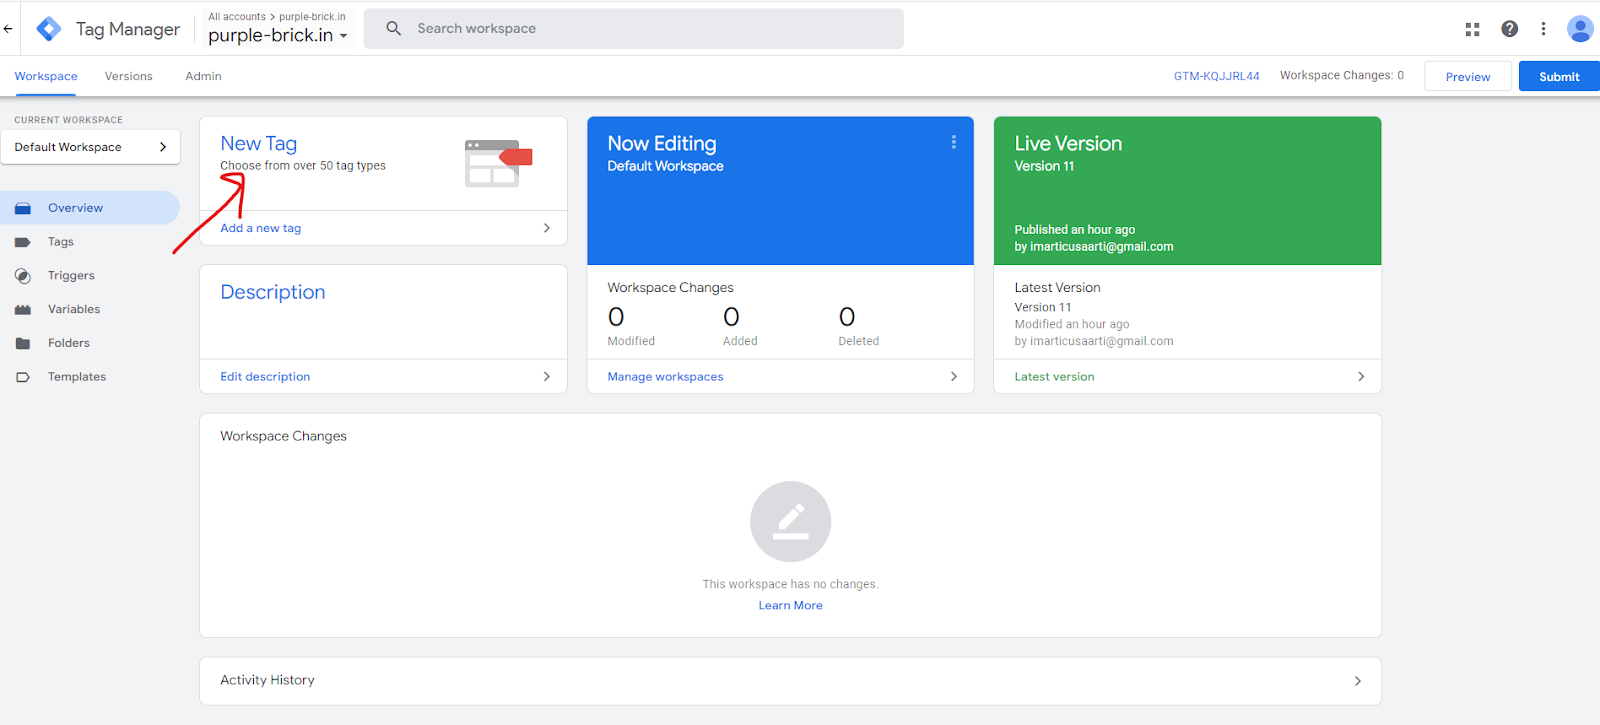
- Now create Tag and Trigger.
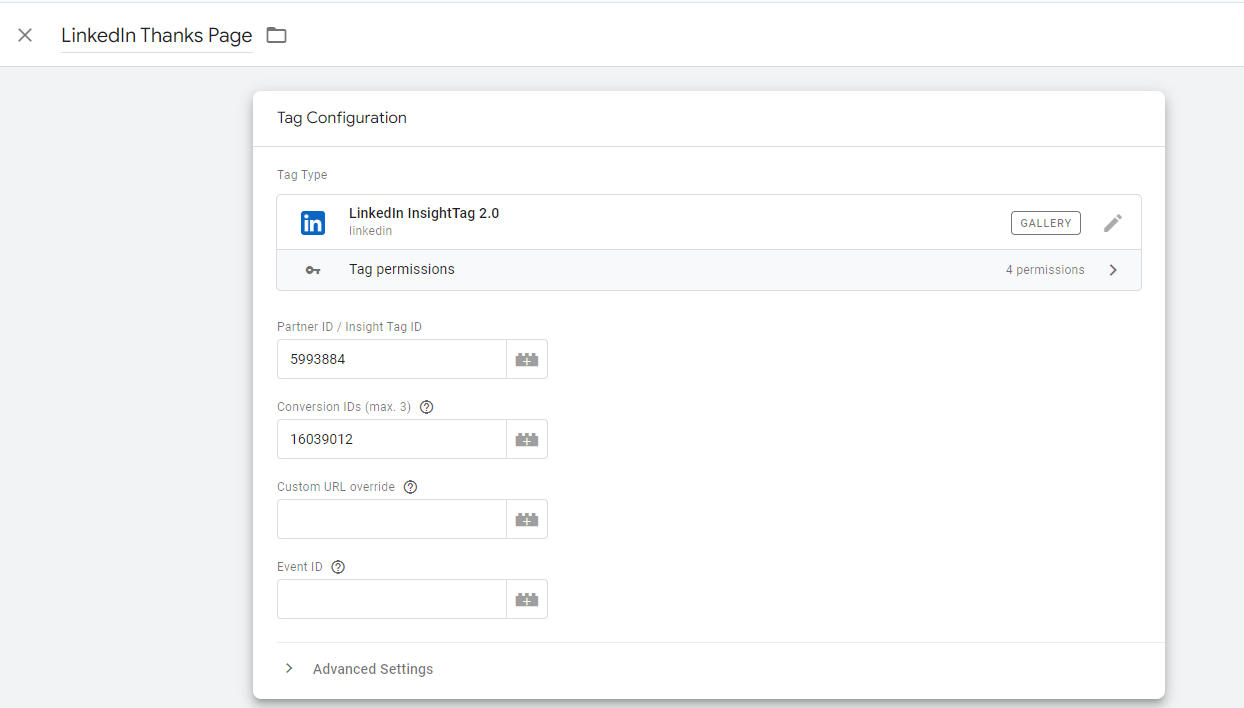
Click on “Tag configuration”. Select “LinkedIn InsightTag 2.0” from Gallery and enter the Partner ID and Conversion Id here.
- Click on “Trigger”. Select “Page View” and then do the following mentioned in the below screenshot.
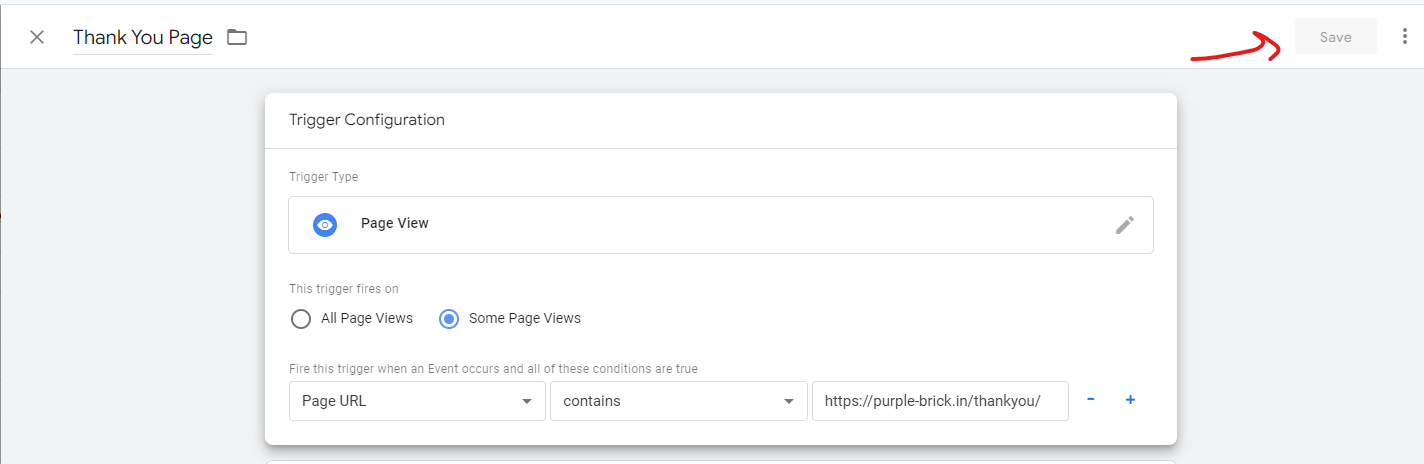
- Now Save the Tag-Trigger and submit the changes in GTM.
- Go back to LinkedIn. Click on “Next Step”.

- Here, you can select the campaigns (if you’ve created any) that will be optimized for the event we just created.
Note: Since no campaigns have been created yet, it’s blank now. We’ve shared another screenshot below of how it looks when campaigns are present.
Finally, click on “Create,” and you’re all set.
Screenshot: If there are any campaigns available on LinkedIn

A) Create a Business Manager in LinkedIn
- Log in to your LinkedIn account and go to https://www.linkedin.com/marketing/businessmanager/create
Enter “website name” as Business Manager account, work email id, select “Manage my business ” and click on the “Create” button.

- Once you click on create, you will see the business manager dashboard and that’s all.

B) Add LinkedIn assets (Page and Ad account) in the Business Manager
Add “Ad Account”
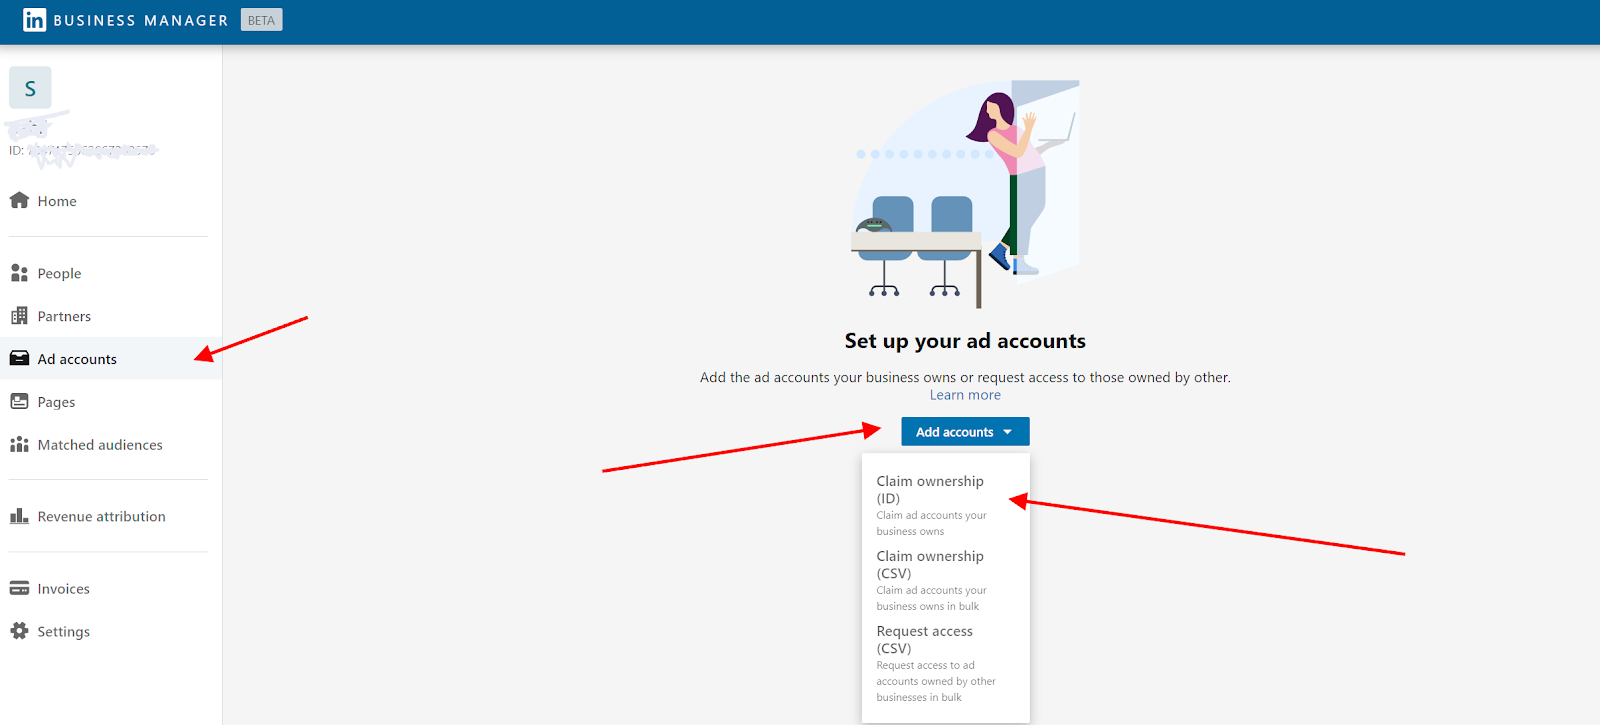
- Click on “Ad Account” from the left panel and then “Add Ad Account”
- Select “Claim Ownership”
- Enter the “Ad account ID”. And all set…
How to find Ad Account ID
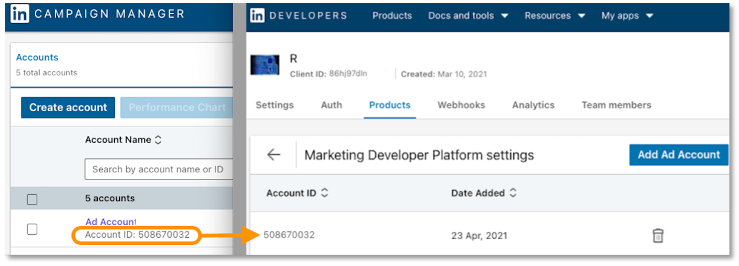
- Go to https://www.linkedin.com/campaignmanager/accounts
- And you will see the Ad a/c id..
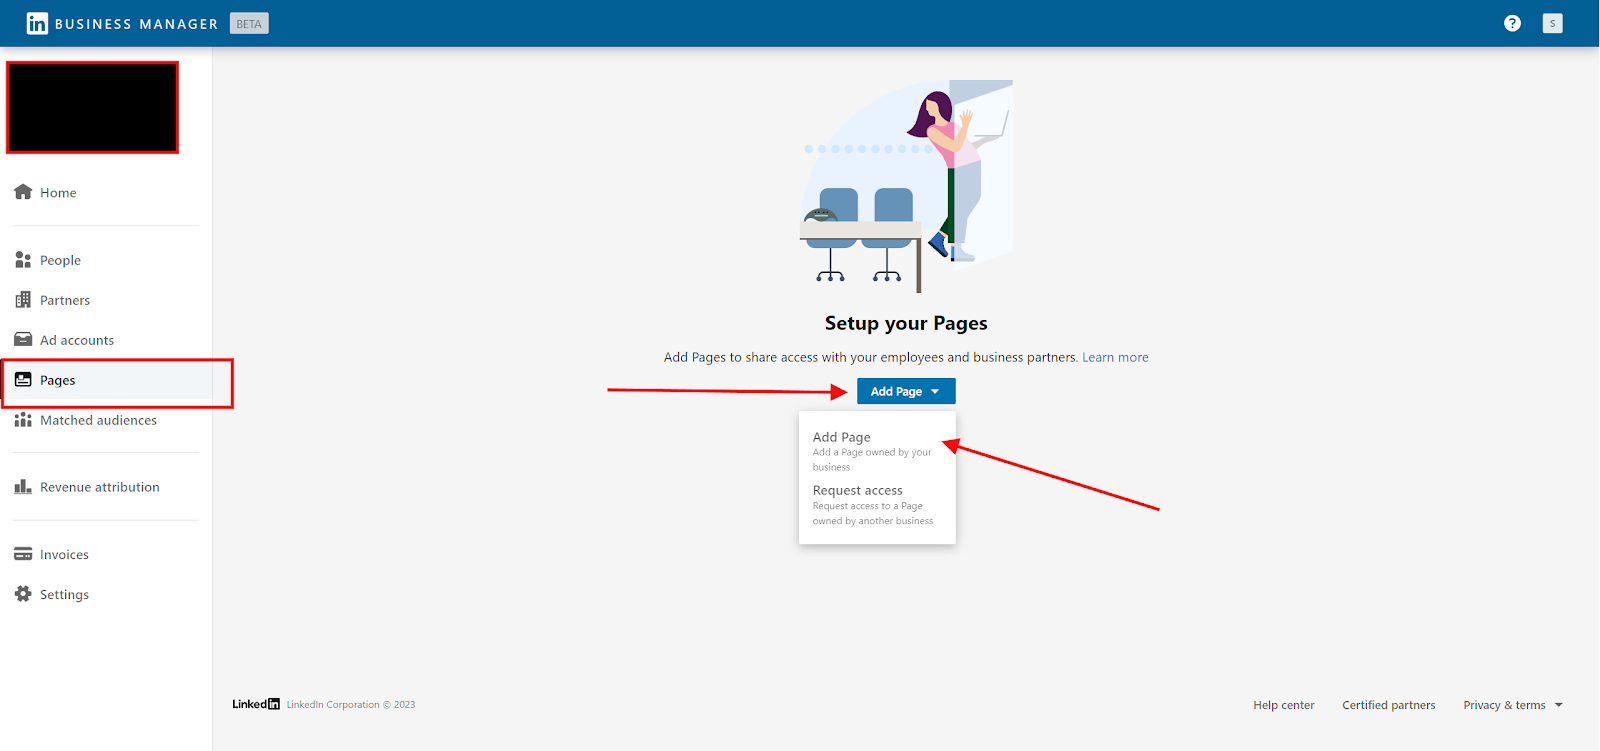
Add “LinkedIn Page”
- Click On Page
- Click on Add page
- Paste Your LinkedIn Page URL.

Nitesh Kuchhal

COMPULSORY SETUP
Enhance your digital marketing expertise with IIT Roorkee and Imarticus Learning’s certification course. Gain practical skills in SEO, social media, and more, taught by industry experts. Stand out in the competitive market with this prestigious certification.

RECOMMENDED SETUP
Enhance your digital marketing expertise with IIT Roorkee and Imarticus Learning’s certification course. Gain practical skills in SEO, social media, and more, taught by industry experts. Stand out in the competitive market with this prestigious certification.
Add a Comment
You must be logged in to post a comment